Table of Contents
- INTRODUCTION
- PURPOSE OF LABEL QUERY CLAUSE IN GOOGLE QUERY LANGUAGE
- HOW TO USE LABEL CLAUSE WITH OTHER CLAUSES IN GOOGLE SHEETS?
- EXAMPLES:
- EXAMPLE DATA:
- EXAMPLE 1 : DISPLAY THE COLUMN EMP_ID WITH THE COLUMN LABEL ” EMPLOYEE ID”
- EXAMPLE 2: EXTRACT GROUP,DOB AND EMP_ID COLUMNS IN THE SAME ORDER AND CHANGE THE COLUMN NAMES FROM GROUP TO CLASS, DOB TO BIRTH-DATE AND EMP_NAME TO NAME
INTRODUCTION
GOOGLE SHEETS is the spreadsheet application offered by Google.
There are many useful functions which are found in almost all the spreadsheet apps like GOOGLE SHEETS or Microsoft Excel or Open Calc and so on but every application has a certain special features which are unique from the others.
One of such features in GOOGLE SHEETS is the use of the QUERY FUNCTION which enables us to use the SQL SERVER kind of queries on our data.
This QUERY LANGUAGE IS KNOWN AS THE GOOGLE VISUALIZATION API QUERY LANGUAGE and is almost similar to the SQL query language.
In this article, we will focus on the LABEL clause which will help us to change the headings of the result table.
So simply stating
THE LABEL CLAUSE HELP US TO CHANGE THE HEADING OR LABEL OF THE RESULT TABLE DYNAMICALLY.
In this article , we are going to learn about the LABEL CLAUSE of the GOOGLE SHEETS QUERY LANGUAGE.
PURPOSE OF LABEL QUERY CLAUSE IN GOOGLE QUERY LANGUAGE
Every clause in Google Sheets query language or Google query language or Google visualization api query language has a specific task to do.
LABEL CLAUSE helps us to change the HEADER TEXT in the result table as per our requirement.
There can be a few situations where we need to change the Heading or the Header text of the result table.
Some of them can be:
- When we need to change the header text for the customer result table for some specific reason which can be for the understanding purpose.
- There can be the cases where the result is the mathematical calculation output and the name of the result is different from the original headers.
- The ORIGINAL TABLE HEADERS can be in the coded format which needs to be changed when the result is generated. For example, if the Header is Emp_ID , we might want to change it to the full words as Employee ID in the result for the easy understanding.
and there can be more reasons too.
THE LABEL CLAUSE SIMPLY CHANGES THE HEADER OF THE RESULT TABLE. THERE IS NO CHANGE IN THE ORIGINAL DATA.
HOW TO USE LABEL CLAUSE WITH OTHER CLAUSES IN GOOGLE SHEETS?
After we have learnt a few bits about the LABEL CLAUSE, it is time to learn the procedure to attach the Label clause with the other queries.
Most of the time , we’ll be applying some selection, grouping, ordering and other operations on the data before changing the labels of the result table. So , we must be very clear about the process of clubbing or joining the different queries together.
For this, we’ll take a simply example.
The LABEL CLAUSE can be simply clubbed at the end of the Query Statement after all the operations has been done from the previous query clauses. The example below describes it better.
Let us try to understand this in a simpler way.
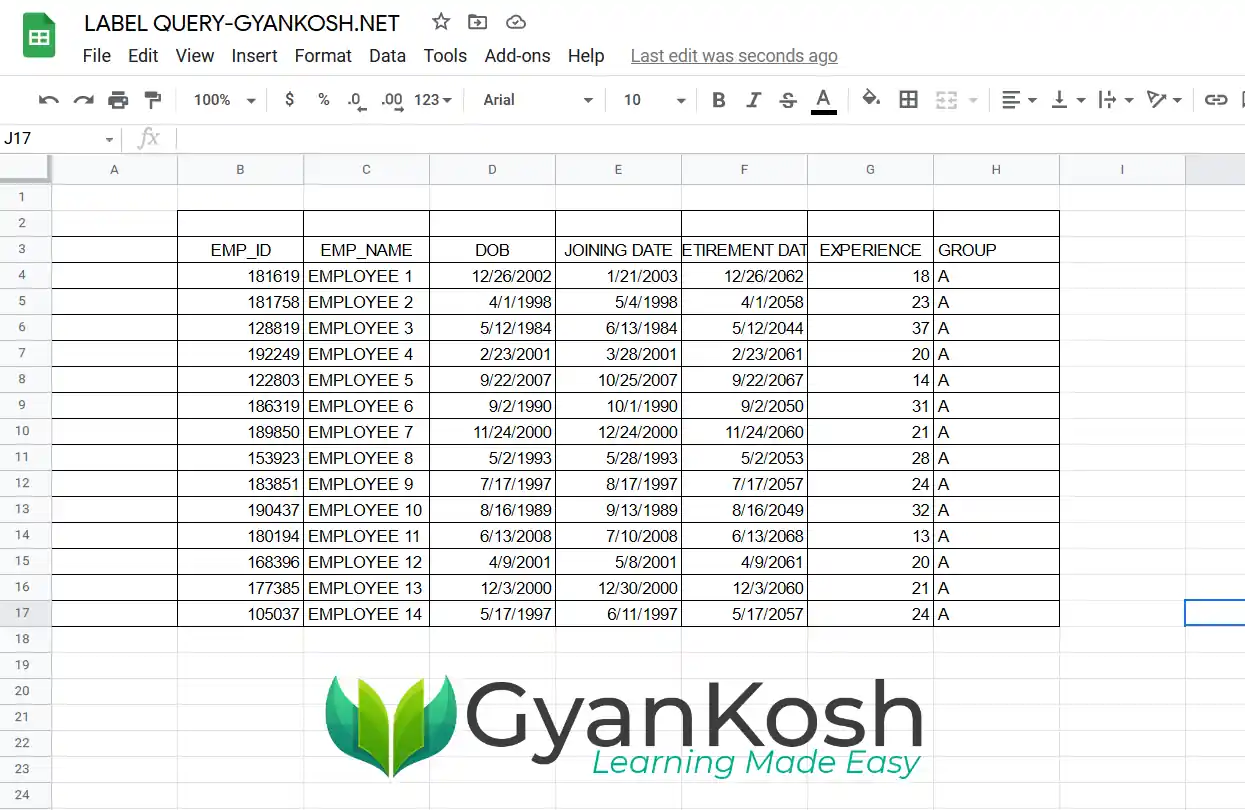
Suppose we have a table with data about the employees.
The data can consist of text or numbers.
Let us take an example to understand the concept.
For the example, we’ll take the data table as shown in the picture below.
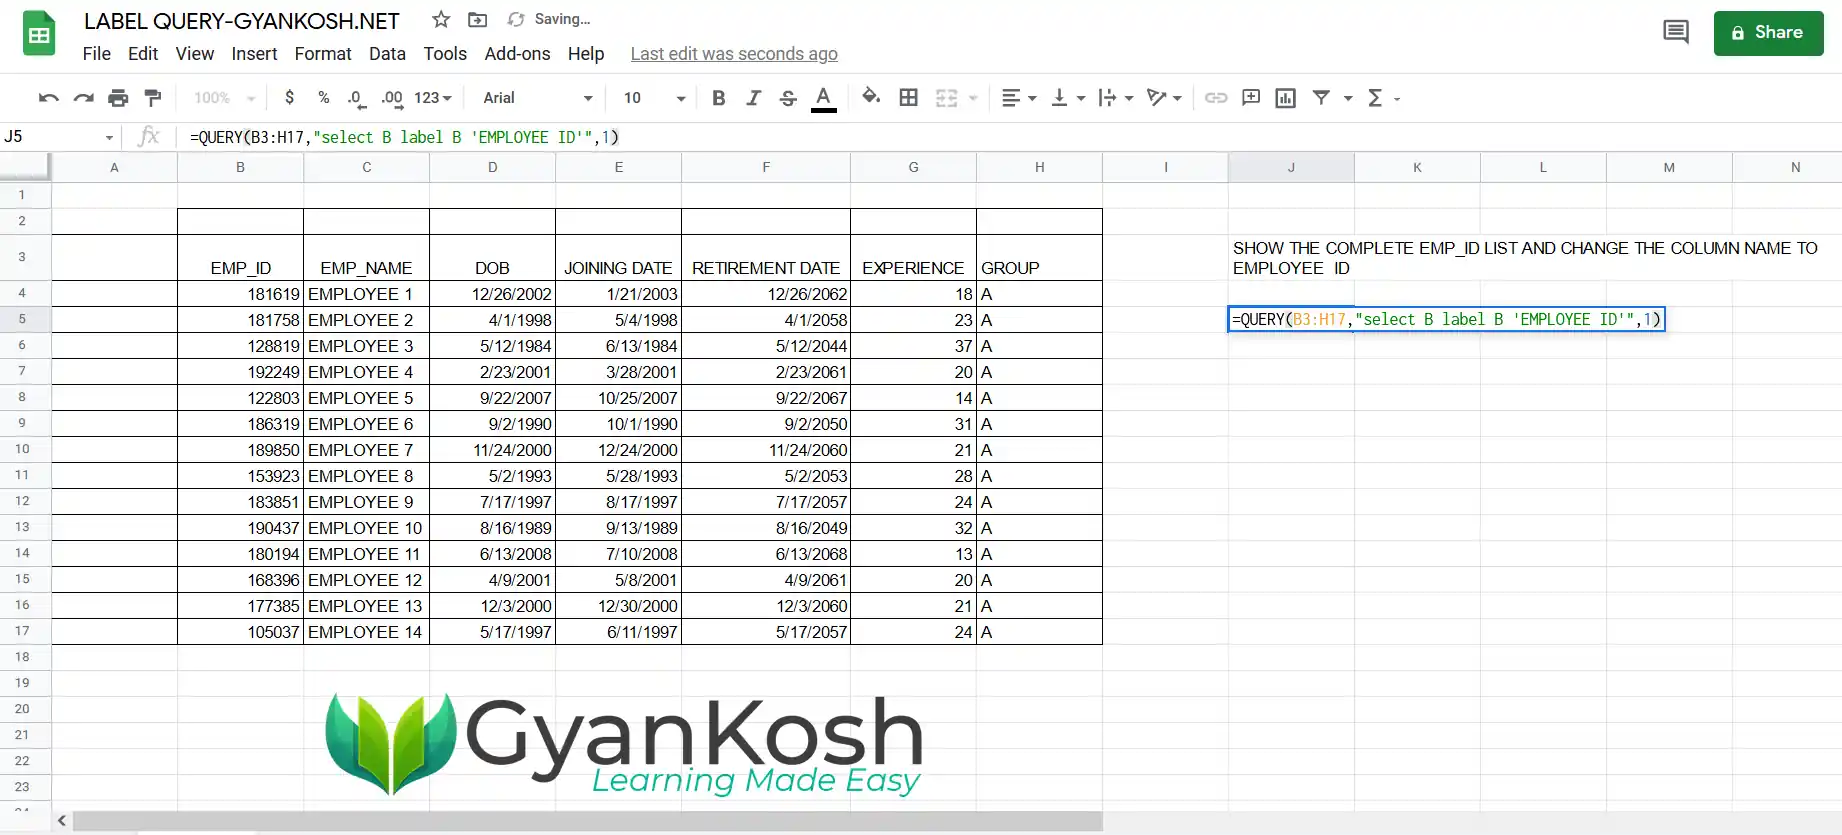
We need to extract the column EMP_ID and change the label to EMPLOYEE ID in the result table.
For this, we’ll be using a simple query as select B label B ‘EMPLOYEE ID’.
In the QUERY , you can see that the first portion of the query which is SELECT B is the simple query stating to give the output as B COLUMN with all the details.
If we use the query as such, it’ll show the output as the column B with its Header i.e. EMP_ID.
By simply adding the LABEL B ‘EMPLOYEE ID’ at the end will make it label the header from EMP_ID to EMPLOYEE ID.
Quite simple!! Isn’t it.
So, the main point here to be learnt is that LABEL CLAUSE simply needs to be attached at the end of your query. Rest of the Query remains the same.
This case has been discussed as EXAMPLE 1 below with pictures for easy understanding.
EXAMPLES:
EXAMPLE DATA:
Let us take a random data and try out our newly learned clause – LABEL.
The example shows a table containing the employee details such as EMPLOYEE ID, AGE , EXPERIENCE and WORK FIELD.
We’ll take a few examples to get the data from the above table in different ways to understand the LABEL QUERY.
EXAMPLE 1 : DISPLAY THE COLUMN EMP_ID WITH THE COLUMN LABEL ” EMPLOYEE ID”
SOLUTION:
We can perform the given task using the SELECT and LABEL QUERY CLAUSES.
We simply make use of the SELECT CLAUSE for selecting the column and LABEL QUERY CLAUSE to change the name of the result table column.
FOLLOW THE STEPS TO CHANGE THE COLUMN NAME OF THE EMP_ID TO EMPLOYEE ID
- Select the cell where you want to get the result by double clicking it.
- Enter the function as =QUERY(B3:H17,”select B label B ‘EMPLOYEE ID'”,1).
QUERY EXPLANATION:
The QUERY used is =QUERY(B3:H17,"select B label B 'EMPLOYEE ID'",1).
Select will populate the selected selected column. We want column B to be listed, so SELECT B will be listed in the output table.
label B 'EMPLOYEE ID' will change the name of the HEADER of Column B to EMPLOYEE ID.

The last argument is 1 which will assume the first row as HEADER in the result table.
- Press Enter.
- The result will appear as shown in the picture below.
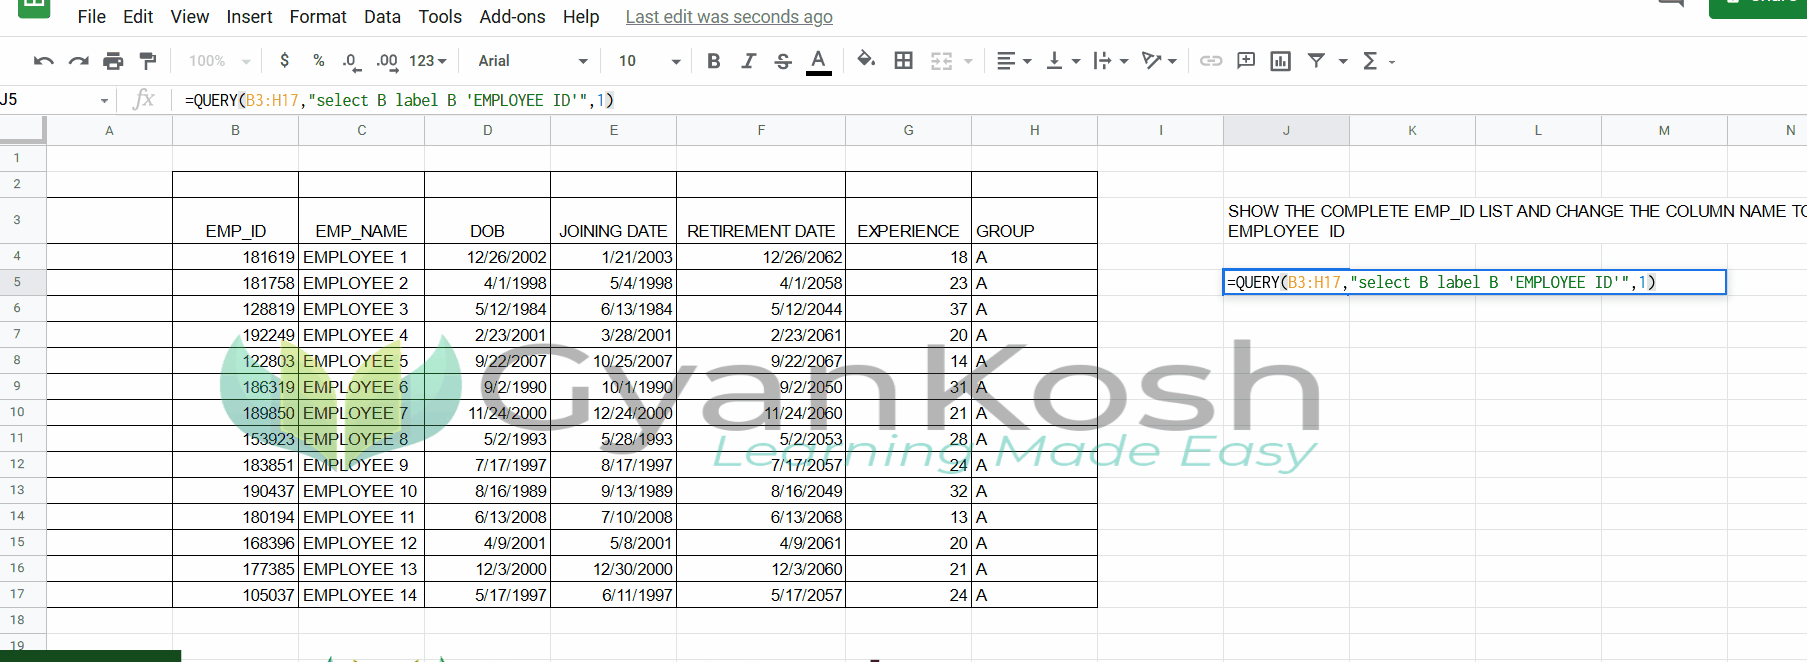
We can see that with the help of a single statement , we could get a complete table with the desired format.We
We saw that label clause can be used for changing the Header labels easily.
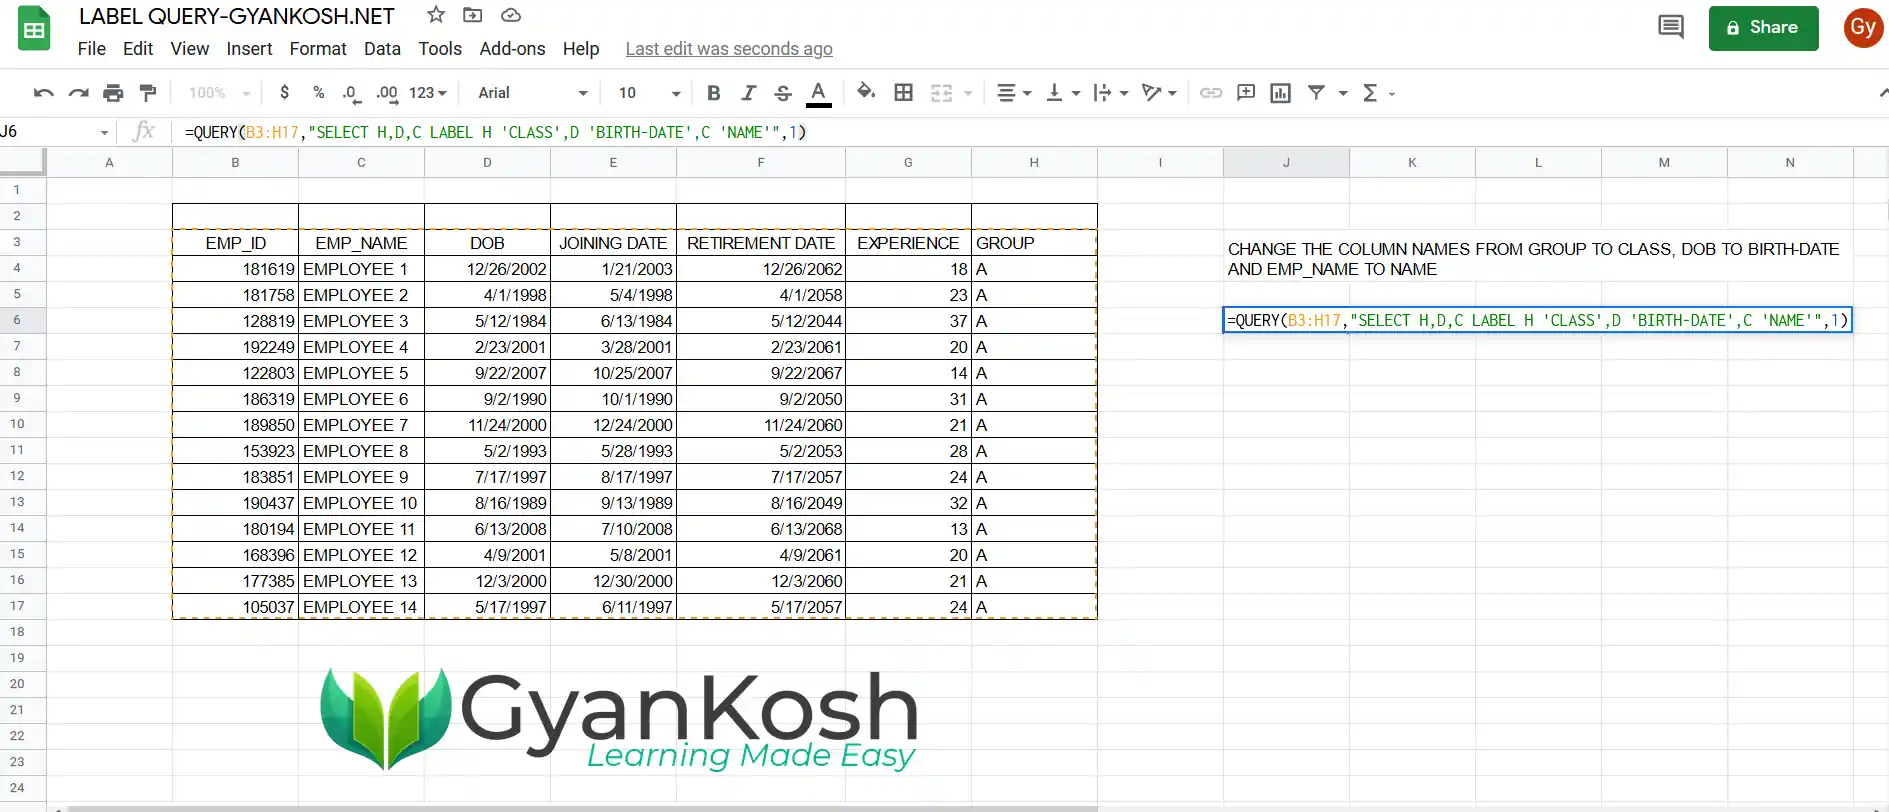
EXAMPLE 2: EXTRACT GROUP,DOB AND EMP_ID COLUMNS IN THE SAME ORDER AND CHANGE THE COLUMN NAMES FROM GROUP TO CLASS, DOB TO BIRTH-DATE AND EMP_NAME TO NAME
The prettiest thing about the Queries is that it help us to get the data as we want without affecting the original data.
In this example too, we’ll take out the different columns and change the names of multiple columns.
FOLLOW THE STEPS TO GET THE COLUMNS IN THE SPECIFIC ORDER AND CHANGE THE NAMES OF THE GIVEN COLUMNS
- Select the cell where you want the result.
- Enter the formula as
=QUERY(B6:F19,”SELECT AVG(E),COUNT(E),F WHERE C=’STAR’=QUERY(B3:H17,”SELECT H,D,C LABEL H ‘CLASS’,D ‘BIRTH-DATE’,C ‘NAME'”,1)
The Query used is

=QUERY(B3:H17,"SELECT H,D,C LABEL H 'CLASS',D 'BIRTH-DATE',C 'NAME'",1)
The first argument is the DATA LIMITS which contain the data from which we'd extract the results.
The second argument is the QUERY.
Select will enlist all the columns listed in the ORDER BY WHICH THE COLUMN NAMES ARE DECLARED i.e. H followed by D followed by C.
After the SELECT CLAUSE has been used, we declare the LABEL CLAUSE and change the column names from H to CLASS, D to BIRTH-DATE and C to NAME.
1 denote the number of Header rows.
- Press ENTER.
- The result will appear as shown in the picture below.

THE RESULT IS A COMPLETE TABLE WITH THE CHANGED COLUMNS NAMES AND THE ORDER EXACTLY AS WE REQUIRED.
THE COLUMN LABELS OR HEADERS CHANGED FROM GROUP TO CLASS, DOB TO BIRTH-DATE AND EMP_NAME TO NAME .
THE OUTPUT FORMAT NEEDS TO BE MANUALLY SET. THE FORMAT WILL DEPEND UPON THE FORMAT OF THE CELL.