Table of Contents
- INTRODUCTION
- WHAT IS A WATERMARK IN GOOGLE DOCS ?
- WHAT ARE THE ADVANTAGES OF WATERMARKS ?
- DIFFERENT WAYS OF ADDING WATERMARK IN GOOGLE DOCS
- WAY 1: CREATING A WATERMARK IN THE GOOGLE DOCS USING BACKGROUND IMAGE
- WAY:2 CREATE WATERMARK FOR GOOGLE DOCS DOCUMENTS USING DRAWING OPTION
- WAY 3 [ BEST WAY ] : CREATE WATERMARK IN GOOGLE DOCS USING HEADER OPTION
- TIPS:
- UPDATE 1:
- WAY 4 :CREATING A WATERMARK IN GOOGLE DOCS USING THE DEDICATED FUNCTION [NEW ADDITION]
INTRODUCTION
Google Docs is word processor offered by Google which is gaining popularity slowly as it offers great features.
A word processor is extensively used for document creations like big reports etc.
There are many basic features which must be present in any word processor to make the things easy for the document writers such as editing options, formatting options, layouts, print setting etc. and many more.
One more requirement can arise sometimes which is currently not available in GOOGLE DOCS.
The requirement is to put a watermark in the google docs.
In this article we’ll learn to create a watermark in the documents of Google Sheets smartly.
WHAT IS A WATERMARK IN GOOGLE DOCS ?
WATERMARK is a picture in the background , which can be a logo or a copyrighted image which represents your company or copyrighted content or any message such as DO NOT COPY or CONFIDENTIAL or anything like that.
A watermark is used frequently in the documents by many organizations in their official documents.
WHAT ARE THE ADVANTAGES OF WATERMARKS ?
A watermark can be very beneficial when used in our data. A few benefits are listed.
- We can control the copying of our content which can be quite easy in the absence of watermark. [ You can see the usage of watermarks in most of the pictures used by our website which contains the watermark GYANKOSH.NET in many different ways. ]
- We can give the owner information as a watermark.
- Some important message can be given as a watermark such as CONFIDENTIAL, DO NOT COPY, COPYRIGHT DETAILS etc.
There can be many more reasons but these were a few important and main reasons for the usage of watermarks in our images, sheets or documents.
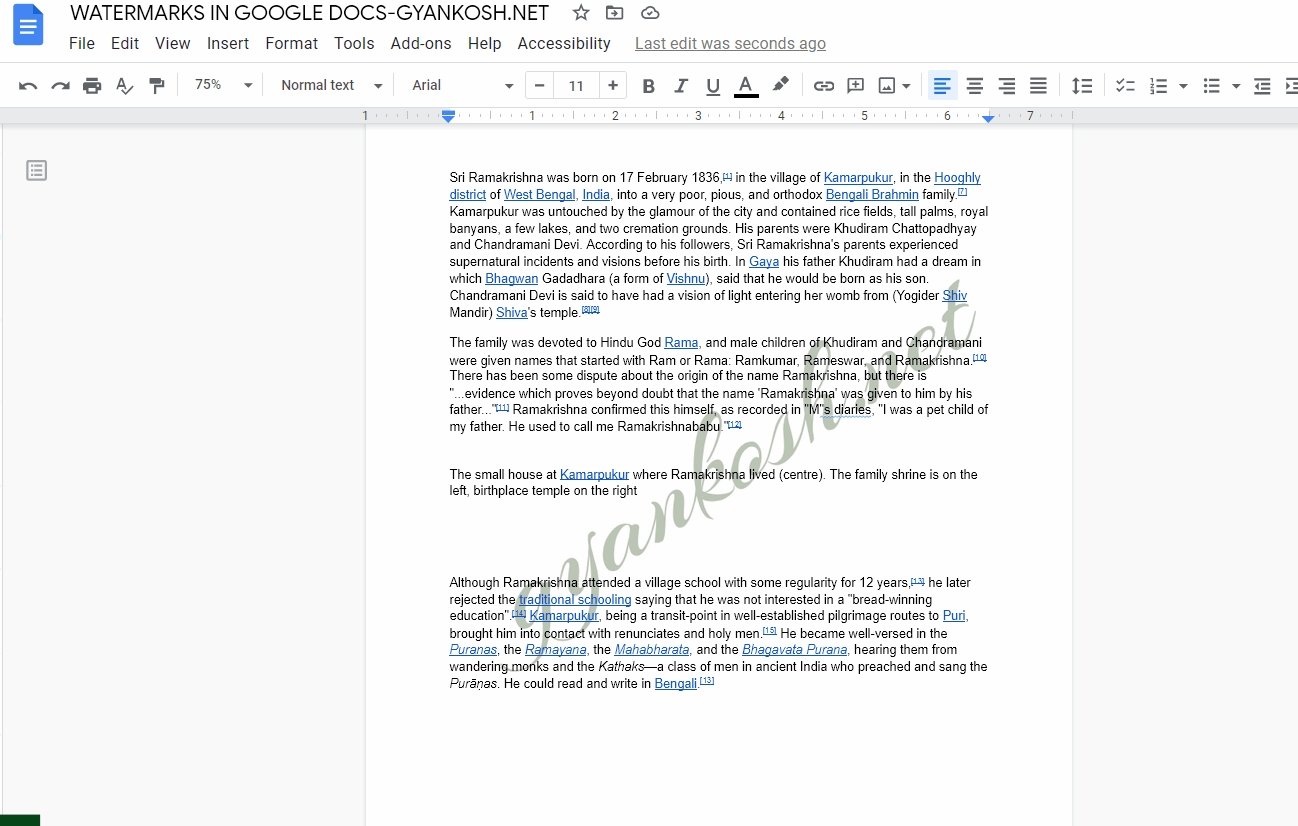
The following picture shows the usage of watermark.

DIFFERENT WAYS OF ADDING WATERMARK IN GOOGLE DOCS
There are a few ways of inserting a watermark in google docs.
All the ways are tested and are 100% working.
Let us discuss the ways.
WAY 1: CREATING A WATERMARK IN THE GOOGLE DOCS USING BACKGROUND IMAGE
We can create a watermark in google docs using a background image.
So, let us create a watermark in the page using the background image.
INSERT THE IMAGE IN GOOGLE DOCS
The first step is to insert the image which you want to use as the watermark.
Follow the steps to insert the image in the document.
- Go to INSERT MENU > IMAGE and choose UPLOAD FROM COMPUTER. [ or other source for the image to be inserted. ]
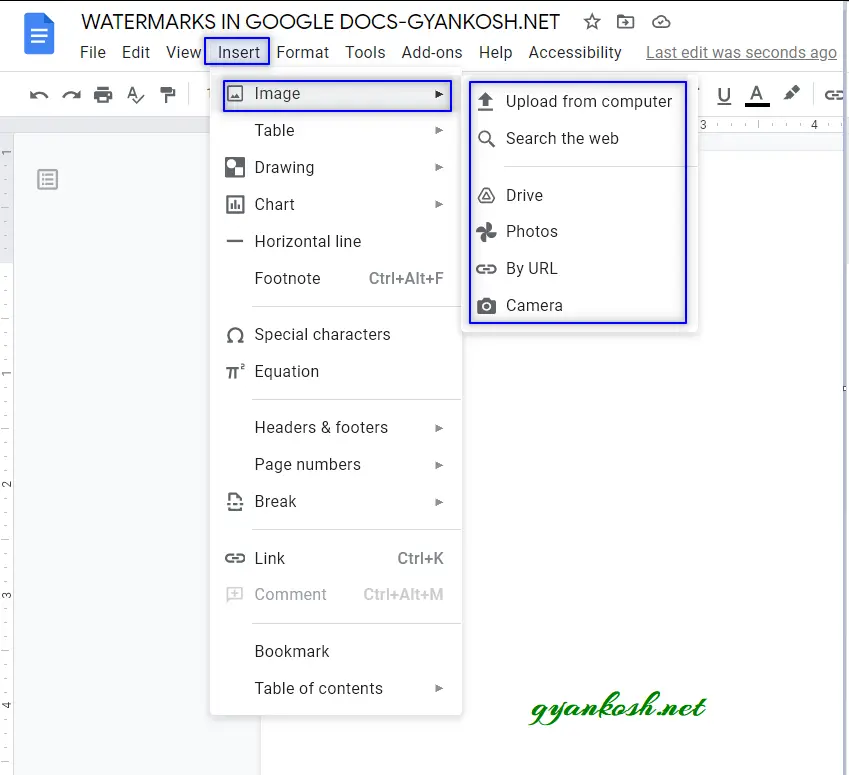
- For our example, we’ll take the option UPLOAD FROM COMPUTER.
- Choose the option and the FILE UPLOAD DIALOG BOX will open.
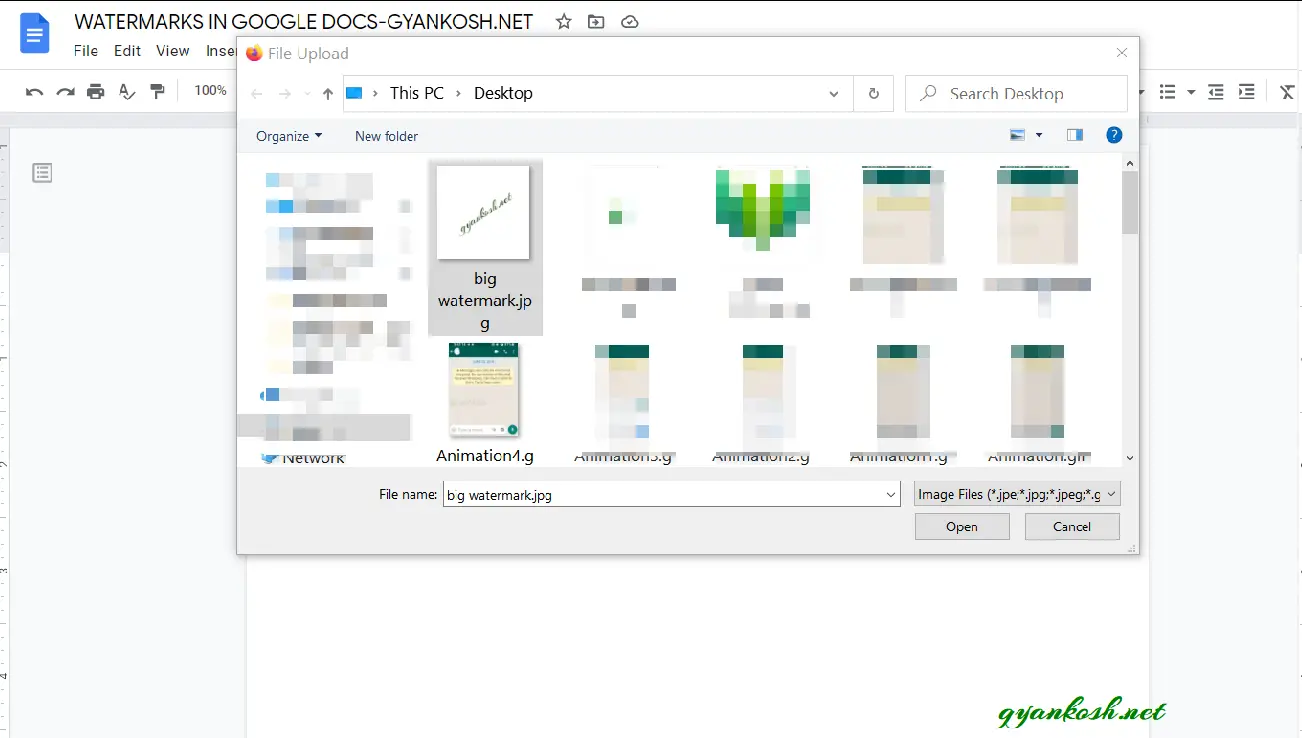
- As we choose the image, it’ll be inserted into the document as shown in the picture below.
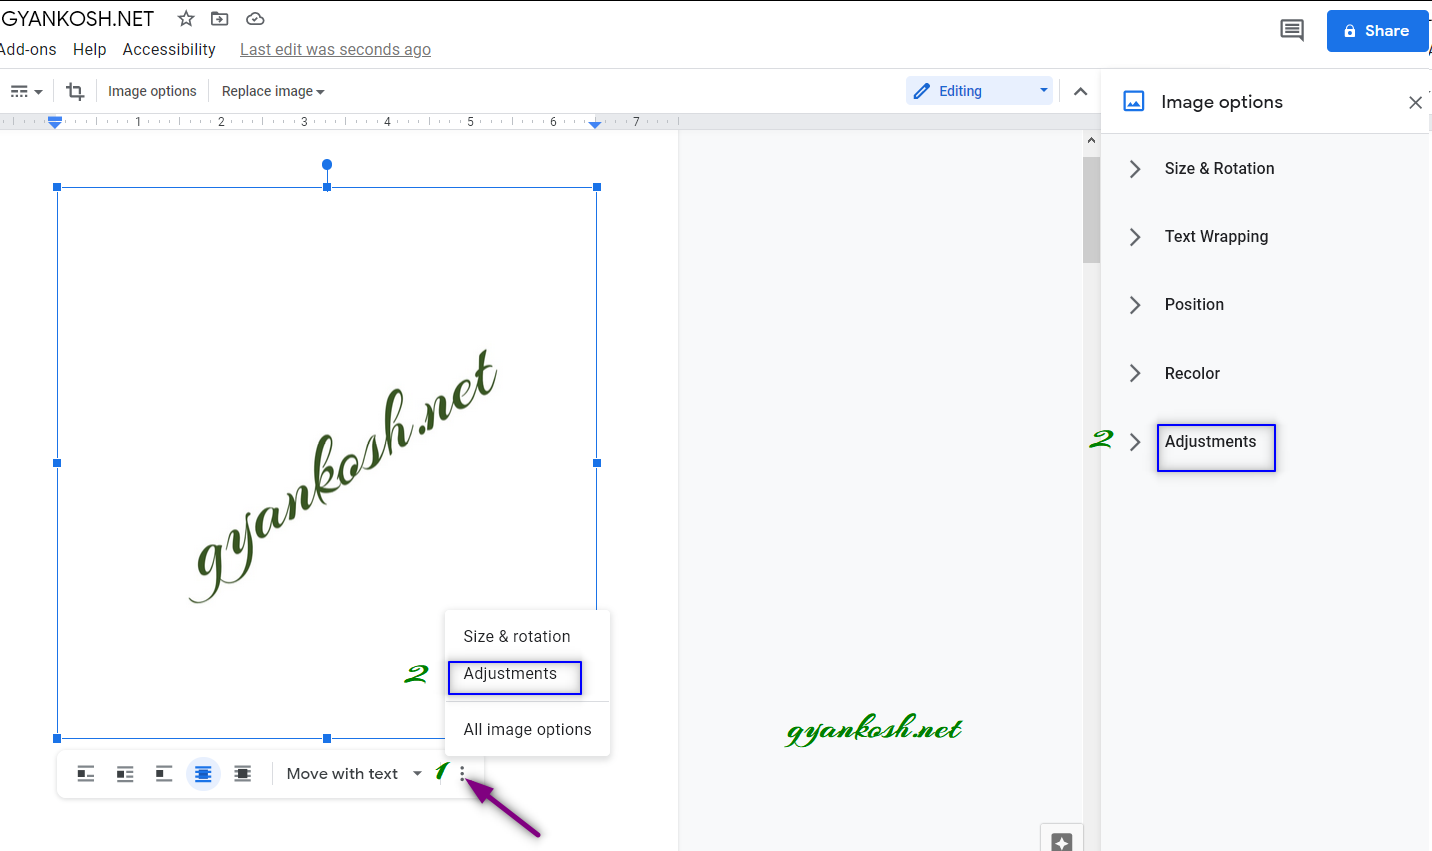
- After the image has been inserted, select the image and choose TEXT WRAPPING as BEHIND THE TEXT option from the bottom options which appear when we select the image as shown in the picture below.

Now, the image is ready.
We can write on the image also as the image will work as the background image due to the TEXT WRAPPING OPTION CHOSEN.
Next task is to make it lighter in color or transparent or washed out. [ So that our text is visible easily and watermark does its work too. ]
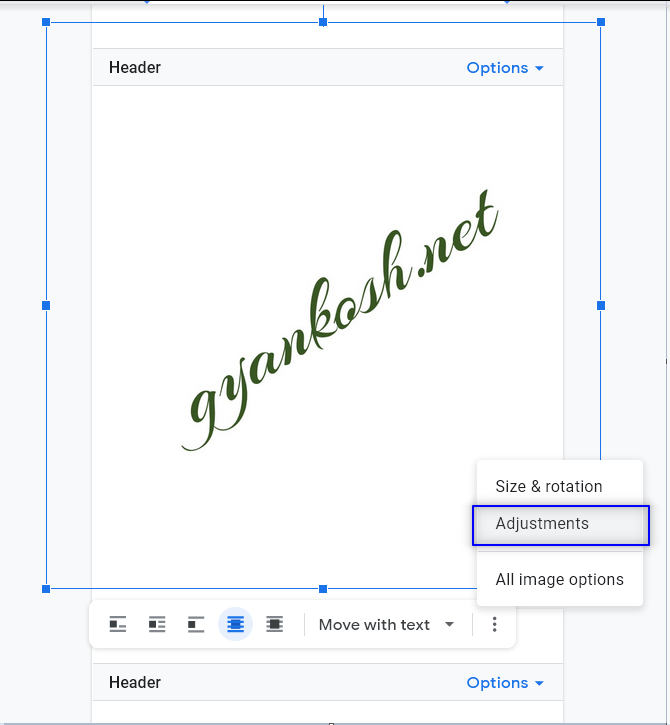
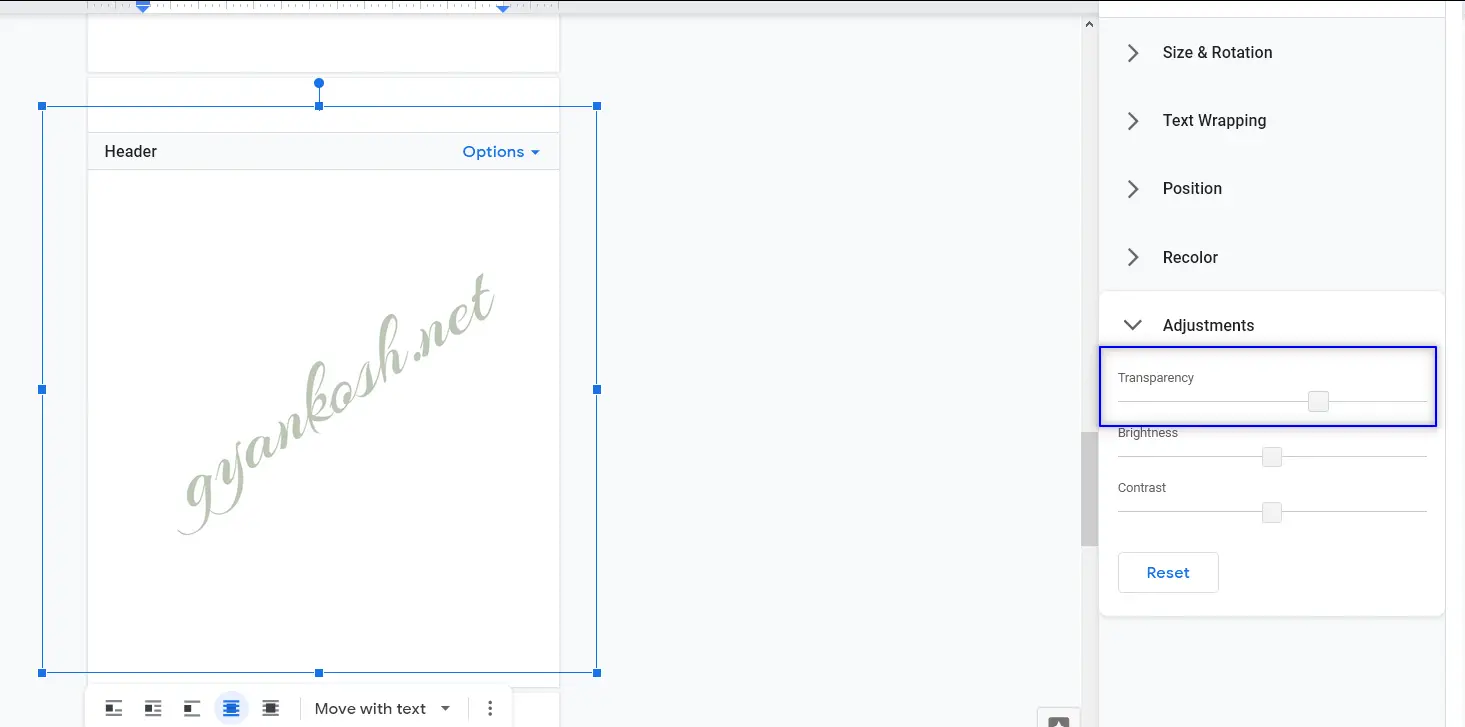
- Select the image and choose ADJUSTMENTS option which will appear after clicking the THREE DOTS [1] in the lower popup menu opened for the options or ADJUSTMENTS [2] also becomes visible from the IMAGE OPTIONS opened up on the right side.
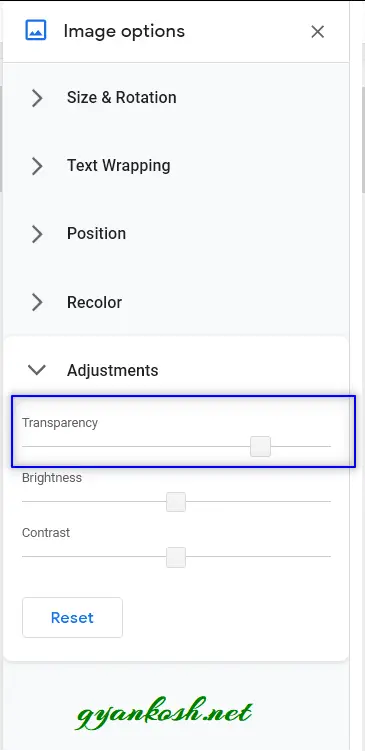
- In the adjustment options, set the TRANSPARENCY as per your choice. [ Transparency is the feature of diluting the color and make it look like washed out.]
- We are done.
- Our document contains the watermark.
LIMITATIONS OF USING BACKGROUND IMAGE AS WATERMARK
We have created a water mark but it has one serious problem.
The watermark will only remain on the same page where the image was imported.
If we want to copy it to other pages, we need to copy the image and paste it.
HOW TO COPY THE WATERMARK TO OTHER PAGES
Our watermark is a simple image which has been customized for our requirements .
- Simple select the image by clicking it.
- Right Click > Copy or CTRL+C.
- Paste it in the other pages.
- The image will retain its properties and will simply paste.
- The image will be behind the text as we set in the original image.
- The problem can arise about the position of the picture only.
WAY:2 CREATE WATERMARK FOR GOOGLE DOCS DOCUMENTS USING DRAWING OPTION
We can also create our own text or drawing to be used as the watermark in our documents.
FOLLOW THE STEPS TO CREATE GRAPHICS AND USE THEM AS WATERMARK IN GOOGLE DOCS
THERE IS A COMPLETE ARTICLE ON HOW TO DRAW GRAPHICS IN GOOGLE DOCS DOCUMENT. CLICK HERE.
- Go to INSERT MENU..
- Choose DRAWING OPTION > NEW.
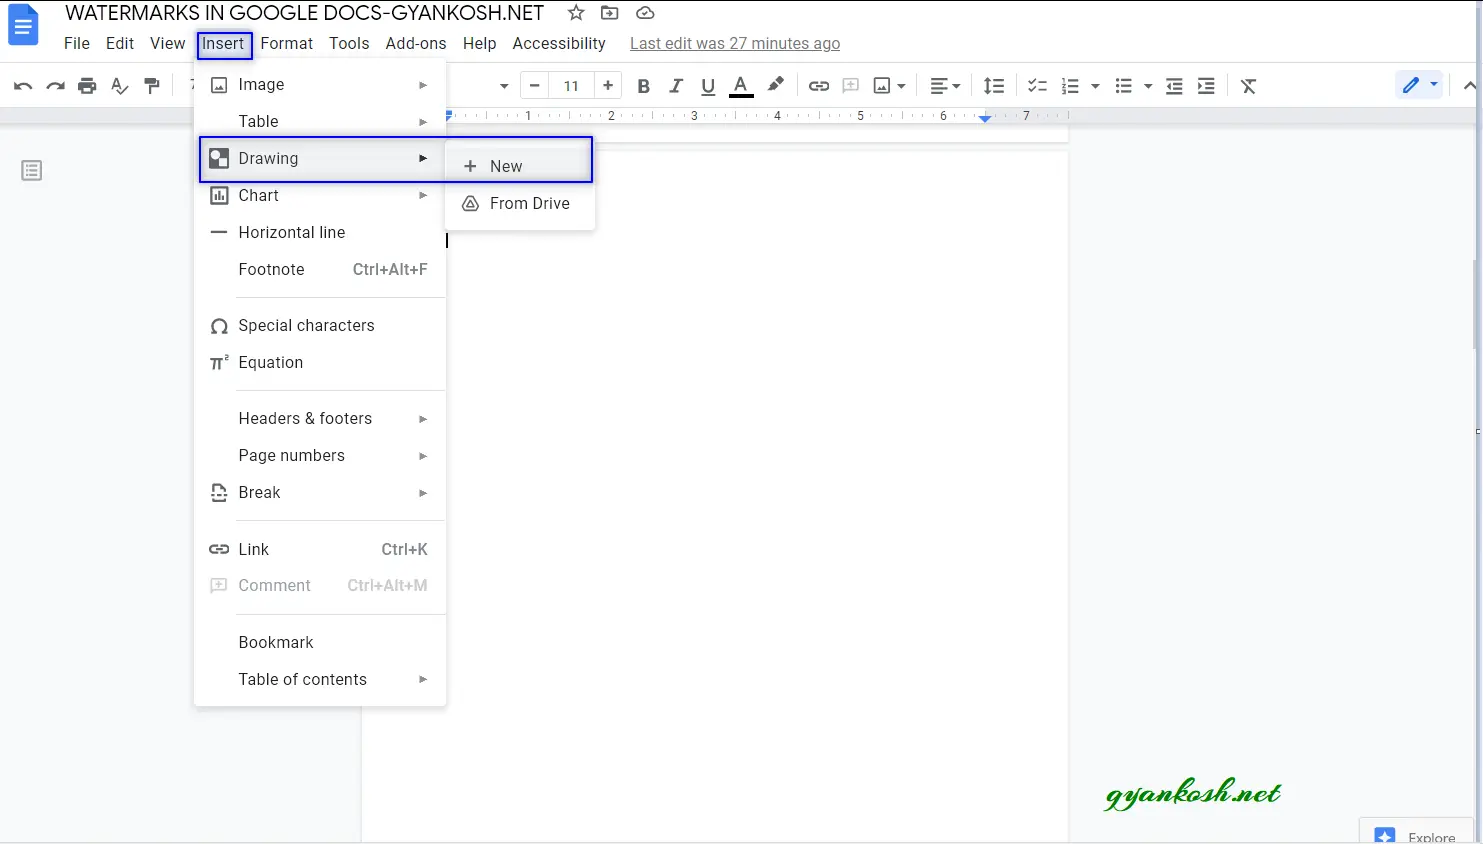
- As we choose NEW DRAWING option, the DRAWING window will open.
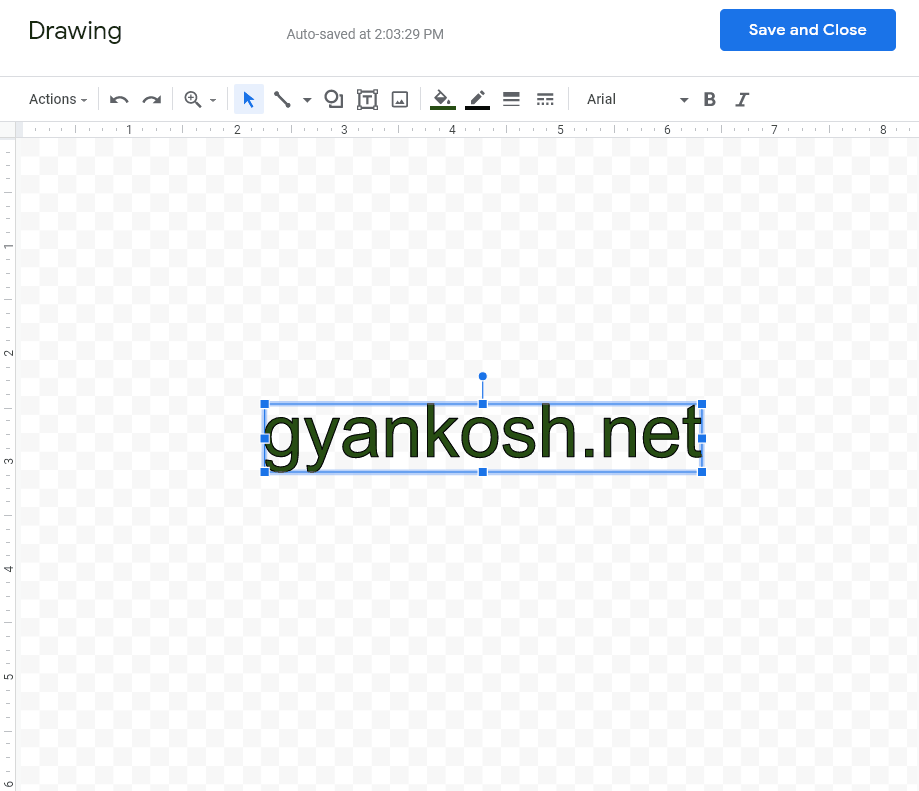
- Create the drawing.
- We have created Word art, Changed the color and rotated it.
In the color option, we have faded out the color using the transparency option.
THERE IS A COMPLETE ARTICLE ON HOW TO DRAW GRAPHICS IN GOOGLE DOCS DOCUMENT. CLICK HERE.
- After the graphics or drawing is ready, click SAVE AND CLOSE as shown in the pic below.
- After SAVE AND CLOSE option, the graphics will be imported into the document.
- Now select the DRAWING and choose TEXT WRAPPING option as BEHIND THE TEXT as shown in the picture below.
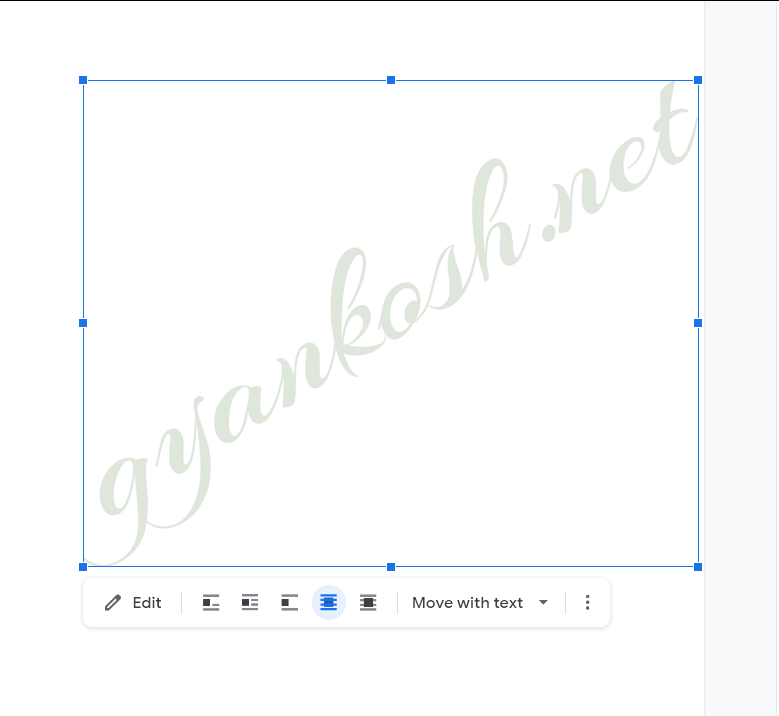
- We’re done.
- The book mark is ready.
LIMITATIONS OF USING DRAWN GRAPHICS AS WATERMARK
We have created a water mark but it has one serious problem.
The watermark will only remain on the same page where the image was imported.
If we want to copy it to other pages, we need to copy the image and paste it.
HOW TO COPY THE WATERMARK TO OTHER PAGES
Our watermark is a simple image which has been customized for our requirements .
- Simple select the image by clicking it.
- Right Click > Copy or CTRL+C.
- Paste it in the other pages.
- The image will retain its properties and will simply paste.
- The image will be behind the text as we set in the original image.
- The problem can arise about the position of the picture only.
WAY 3 [ BEST WAY ] : CREATE WATERMARK IN GOOGLE DOCS USING HEADER OPTION
This is by far the most important and useful option to create a watermark in Google Docs document.
HEADER OPTION PROVIDES US THE OPTION TO INSERT THE WATERMARK IN ONE PAGE AND IT REPLICATES TO ALL THE PAGES OF THE DOCUMENTS.
THE PLACEMENT IS EXACTLY SAME IN ALL THE PAGES DUE TO THE HEADER OPTION.
FOLLOW THE STEPS TO INSERT A WATERMARK USING HEADER OPTION
- Go to INSERT MENU and choose HEADER AND FOOTERS > HEADER.

- It’ll make the upper portion of the page editable.
- We can also enter the HEADER EDITING MODE directly by simply double clicking in the upper portion of the page as shown in the picture below.
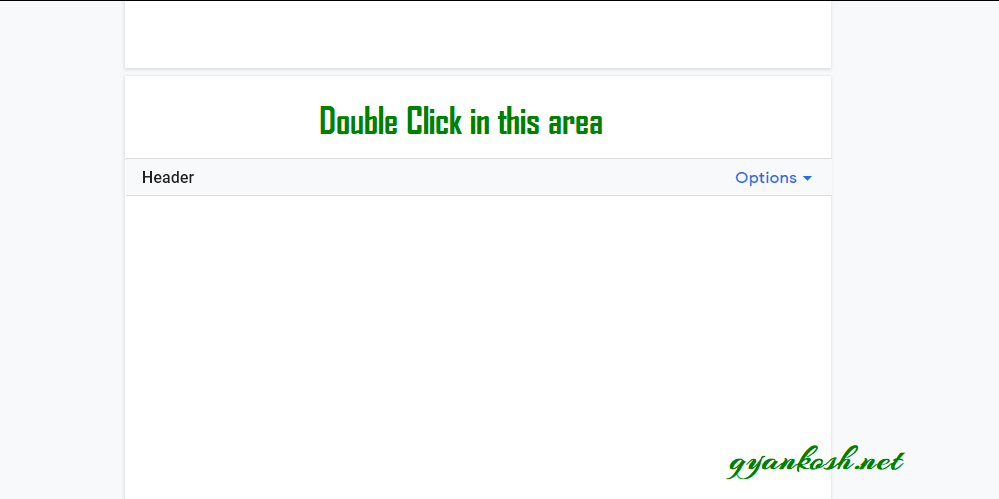
- After the HEADER OPTION is activated, insert the watermark image.
- Go to INSERT MENU.
- Choose IMAGE and choose the SOURCE to insert the image. [ Refer to WAY 1 to learn the elaborated process of inserting an image ].
As we insert the image, it’ll be inserted in the upper portion of the page something like shown in the picture below.
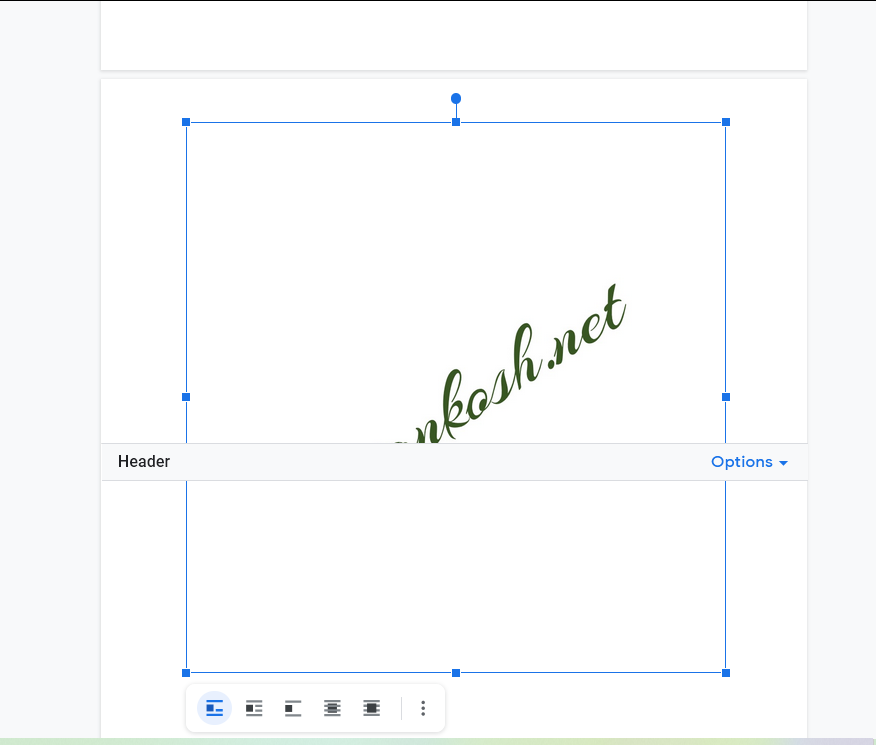
- After the image has been inserted, adjust it in a way so that the text portion comes in the location as they way you want it to be.
- The adjustments can be done using the small squares and rotation can be done using the small disc on the top of the image.
- After the adjustments have been done, select the picture and choose TEXT WRAPPING STYLE as BEHIND THE TEXT.
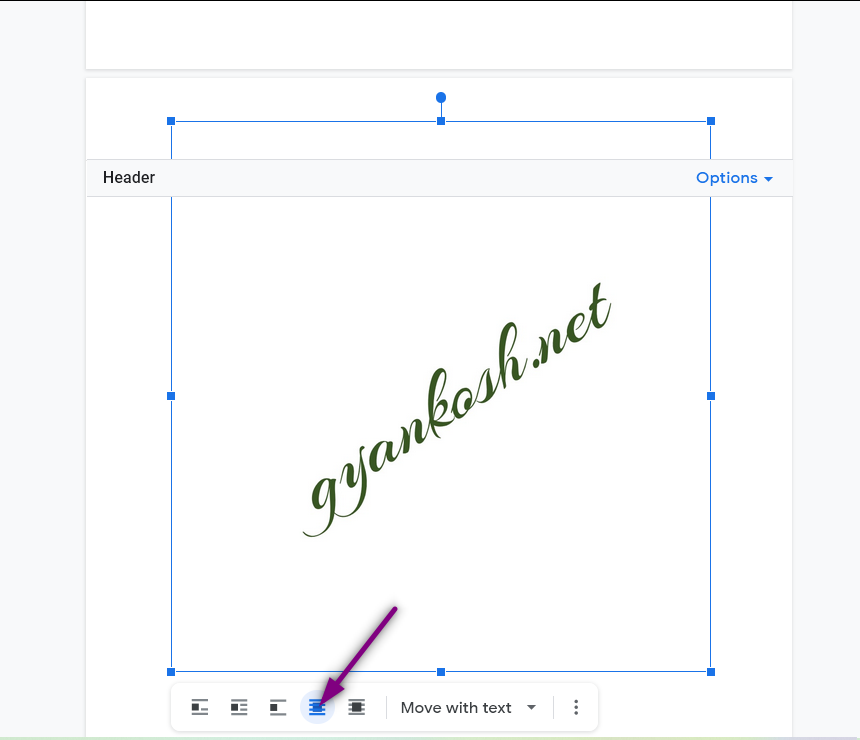
- After selecting the TEXT WRAPPING style, click the THREE DOTS on the right and choose ADJUSTMENTS.
- After clicking the adjustments, the options pane will open on the right.
- Set the transparency as required to make the header image washed out.
- We are done.
All the pages will contain the watermark.
THE IMAGE CUSTOMIZED IN THE HEADER OF ONE PAGE WILL REFLECT ON ALL THE PAGES OF THE DOCUMENTS.
TIPS:
It’ll be easier if you could create a picture containing enough width and height just like the page and watermark text in the center. [ or any position which you want].
If you have a smaller image, enlarge the header portion and paste the image there.
UPDATE 1:
WAY 4 :CREATING A WATERMARK IN GOOGLE DOCS USING THE DEDICATED FUNCTION [NEW ADDITION]
Google Docs have recently introduced a dedicated function to create watermark.
Let us learn the usage of this functionality.
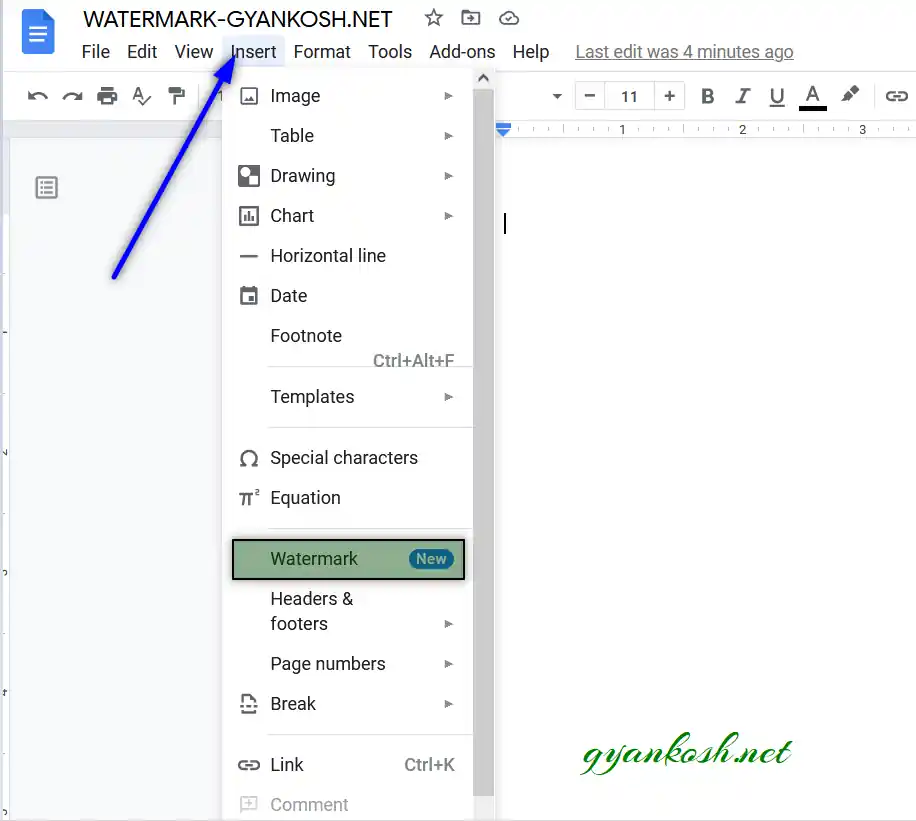
BUTTON LOCATION FOR INSERTING WATERMARK IN GOOGLE DOCS
The newly introduced option to create watermark is given under the INSERT MENU>WATERMARK.
The following picture shows the location.
STEPS TO CREATE A WATERMARK IN GOOGLE DOCS USING THE DEDICATED OPTION
The process of using the watermark using the given option is very simple.
Follow the steps.
- Go to the INSERT MENU and click on WATERMARK OPTION.
- WATERMARK OPTIONS window will open on the right.
- Click on the space showing the caption SELECT IMAGE.
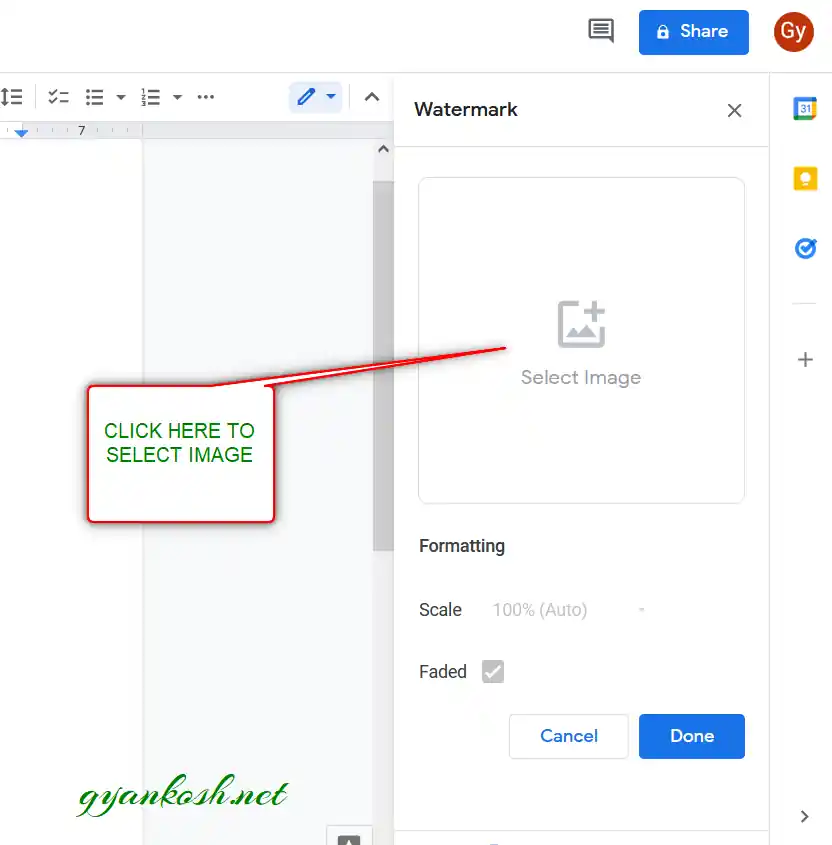
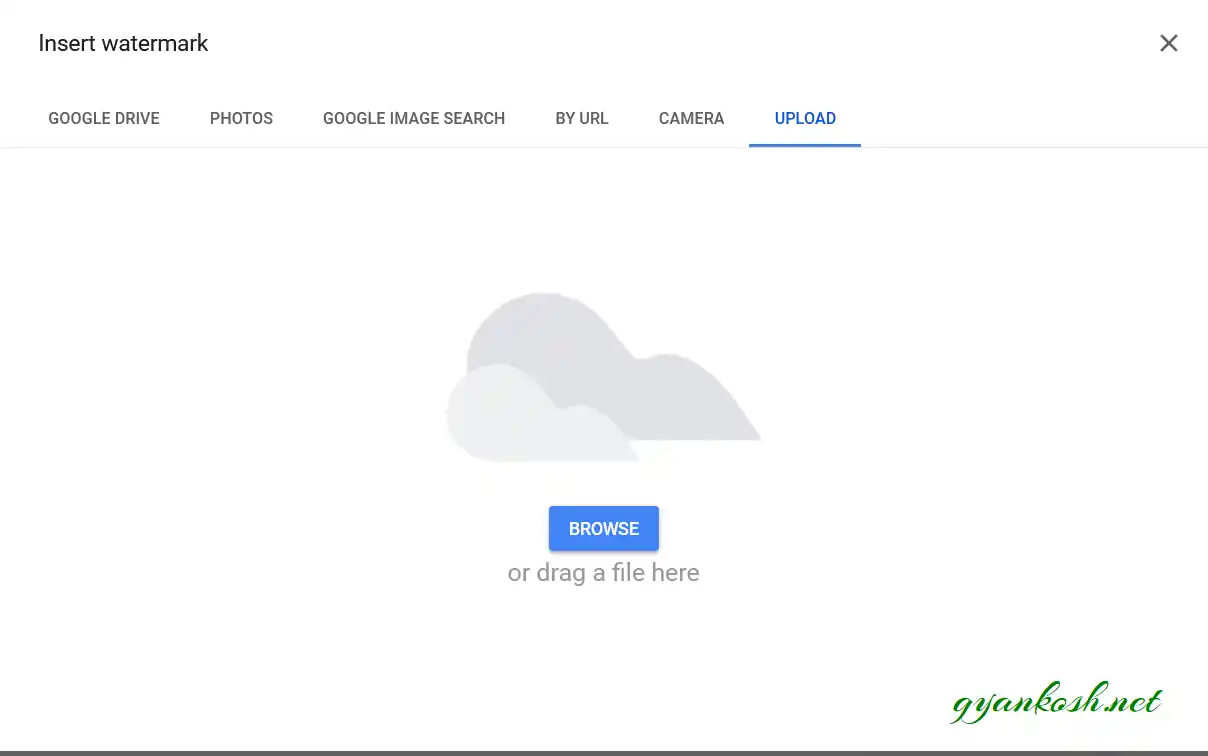
- As we click on the SELECT IMAGE CAPTION, the image file choosing dialog box will open.
- Choose the image of your choice or upload a fresh one. [ The image which you want to use as a watermark ].
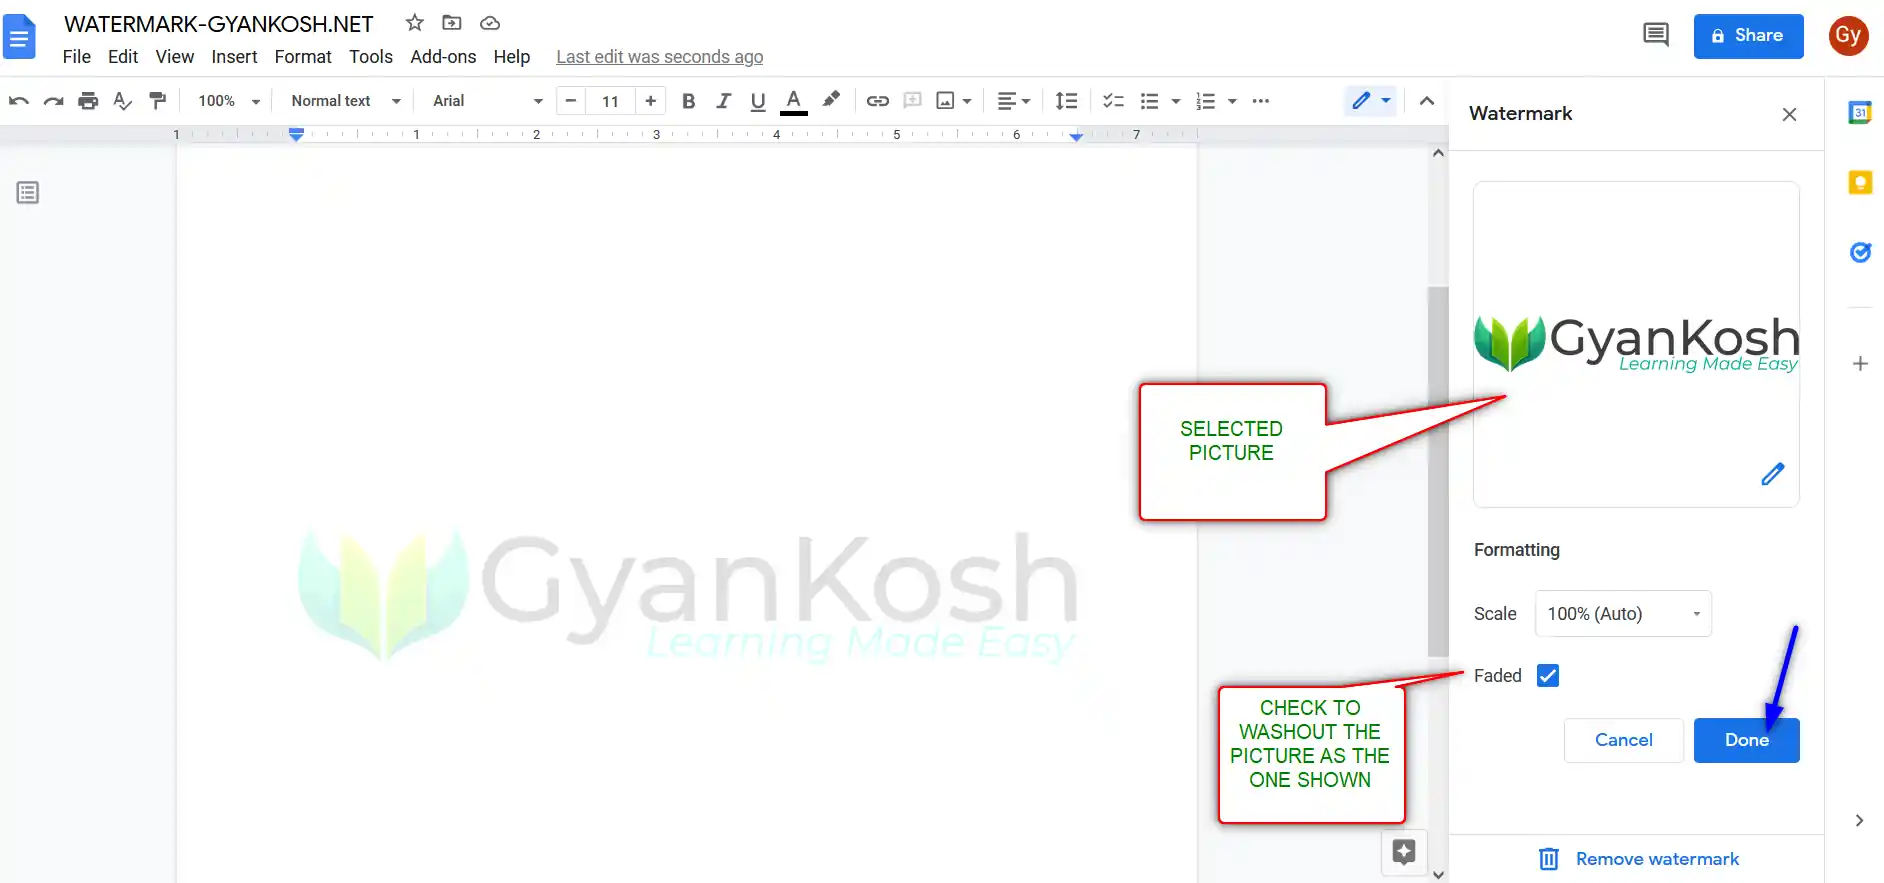
After we choose the file, it’ll start showing in the Watermark options window.
FADED will be selected by default which will washout the colors of the image used. You can click it again or uncheck it if you don’t want the colors to be washed. Although not recommended as it will make the useful text difficult to read.
After all the desired settings, click DONE.
- After completing all option, the watermark is applied as shown in the picture below.
ALL THE PAGES WILL HAVE THIS BOOKMARK.
The following picture shows the bookmark.

SET THE SIZE OF THE WATERMARK
The size of the watermark can be easily set.
Go to the WATERMARK OPTIONS WINDOW and choose the size from the drop down.
The size can be increased or decreased as per requirement.
As you change the size , the real watermark size will be visible in the page.

HOW TO REMOVE WATERMARK FROM THE PAGES IN GOOGLE DOCS?
The removal of the watermark is an easy process.
FOLLOW THE STEPS TO REMOVE THE WATERMARK IN GOOGLE DOCS
- Go to the INSERT MENU and choose WATERMARK.
- The WATERMARK OPTIONS WINDOW will open on the right.
- At the bottom of the options, click the option REMOVE WATERMARK.
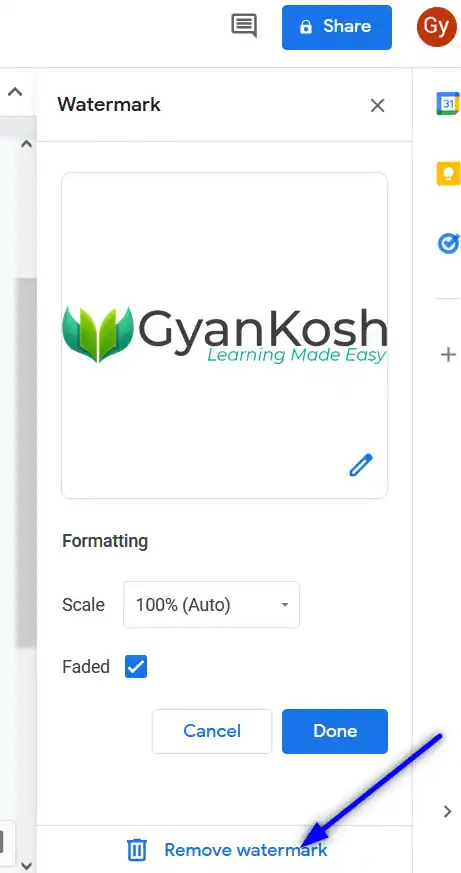
The watermark will be removed from the pages.