Table of Contents
- INTRODUCTION
- WHAT IS AN EXPENSE TRACKER ?
- GYANKOSH.NET – EXPENSE TRACKER
- LINK FOR THE TEMPLATE
- STEPS TO USE THE EXPENSE TRACKER
INTRODUCTION
Google Sheets is a great spreadsheet tool offered by Google.
We can create many helpful applications in google sheets whether these are related to our work or home.
We can really create brilliant applications in google sheets for official or personal use. One such application is the creation of an expense tracker to keep your budget online.
In this article, we are providing the user with a FREE FULLY CUSTOMIZABLE EXPENSE TRACKER for personal use with free template and instructions on the way to use it.
WHAT IS AN EXPENSE TRACKER ?
An Expense Tracker is sometimes called as BUDGET PLANNER.
An expense planner is an application which help us to keep a track over the earnings, expenses and different financial status at all the times.It is also called a budget planner.
An expense tracker is a simple list of all the INs and OUTs for your finances and keeps you updated about the current status.
For example, suppose we get paid $100 in a month.
We spend the money for our living in various ways such as,
rent
gas (fuel)
groceries
household items
transportation
miscellaneous purchases and much more.
If we don’t use the expense tracker, it is hard to keep a track of it.
So, we can make use of this expense tracker and keep ourselves updated all the time.
GYANKOSH.NET – EXPENSE TRACKER
Let us get acquainted to the GYANKOSH.NET EXPENSE TRACKER and its features.
The home screen of the expense tracker has been shown below.
FEATURES OF THE EXPENSE TRACKER
The expense tracker provides the following options to the users
- CUSTOMIZABLE EARNING OPTION LIST
- CUSTOMIZABLE EXPENSES OPTION LIST
- GRAPHICAL REPRESENTATION OF EXPENSES AND EARNINGS
- NET AMOUNT IN HAND AFTER SETTLING ALL THE EARNINGS AND EXPENSES.
- TOP THREE EXPENSES
- TOP THREE EARNING SOURCES
- SEPARATE SCRUTINIZING SHEETS FOR ENTRY OF EXPENSES AND EARNINGS.
- DATE OPTION
LINK FOR THE TEMPLATE
Simply click the link given below.
STEPS TO COPY THE TEMPLATE
- If you are logged in to your google account, you’ll get an option to CREATE A COPY.
- Click it.
- A copy will be created for you.
- Use it.
- If you are not logged in, google will first ask you to login and then you’ll be taken to CREATE A COPY page.
- If you don’t have a google account, create one first.
- After logging in , click the link and create a copy for yourself.
STEPS TO USE THE EXPENSE TRACKER
We can simply use the expense tracker in the following steps.
ALWAYS START THE TRACKER FROM THE 1ST OF ANY MONTH.
- Edit the lists as per your requirement
- Enter the Earnings as you get them with entry of dates too.
- Enter the expenses.
- Study the result.
1.SET THE LISTS AS PER YOUR REQUIREMENT
The first requirement is to set the lists as per your requirements.
FOLLOW THE STEPS TO SET THE LISTS AS PER YOUR REQUIREMENTS
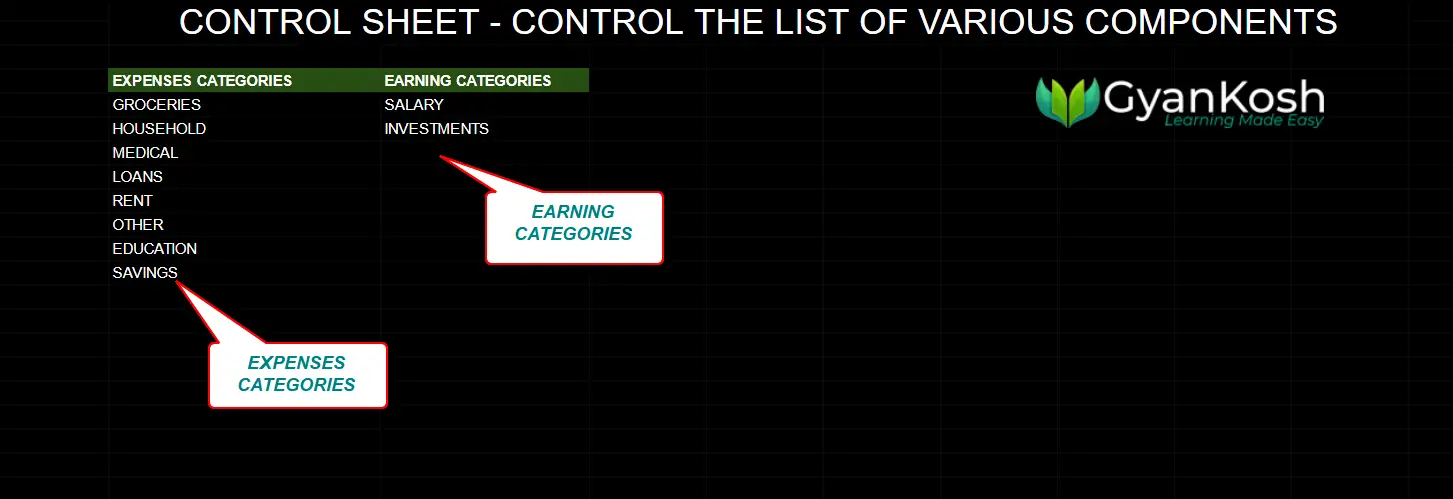
- Open the CONTROL KEYS sheet.
- You’ll find two headers EXPENSES CATEGORIES and EARNING CATEGORIES.
- Enlist your all the categories for the expenses under EXPENSES CATEGORIES and all the earning categories under the EARNING CATEGORIES header.
- The structure of the sheet is shown below.
DEMONSTRATION OF EDITING THE LISTS AS PER REQUIREMENT.
The process discussed above is shown in the animation below.

2. ENTER THE EARNINGS:
After we have set our categories in STEP 1, it is now time to start using the tracker.
Whenever you make any expense, simply follow these steps.
- Open the tracker.
- Go to EARNINGS sheet.
- Under DESCRIPTION, enter the description of the EARNING DETAILS in your own words. [ It is just for reference ].
- Double Click the DATE COLUMN and the calendar will open.
- Choose the date.
- Double click the cell under CATEGORY COLUMN and the list of the categories, which you have set, will open.
- Choose the category.
- Enter the amount of the transaction. [ No need to put $ sign. It’ll come automatically ].
- Repeat the process whenever you receive any earnings.
Start entering the earnings by simply opening the EARNINGS SHEET and entering the data in the format given.

DEMO SHOWING THE ENTRY IN EARNINGS SHEET:
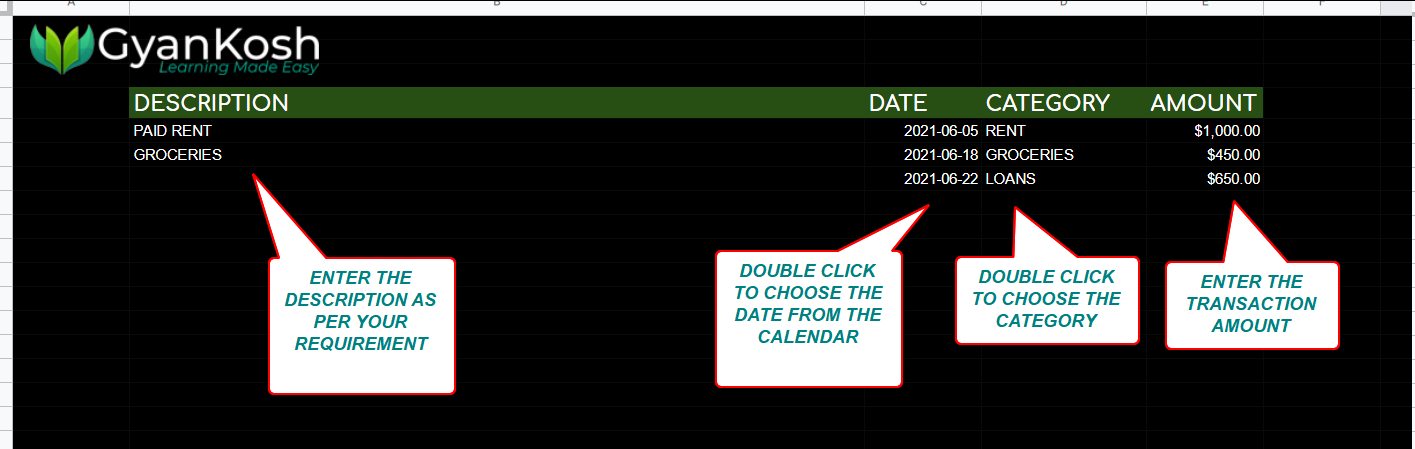
3. ENTER THE EXPENSES
- Open the tracker.
- Go to EXPENSES sheet.
- Under DESCRIPTION, enter the description of the expense in your own words. [ It is just for reference ].
- Double Click the DATE COLUMN and the calendar will open.
- Choose the date.
- Double click the cell under CATEGORY COLUMN and the list of the categories, which you have set, will open.
- Choose the category.
- Enter the amount of the transaction. [ No need to put $ sign. It’ll come automatically ].
- Repeat the process whenever you make any expense.
DEMONSTRATION:
DEMO SHOWING THE ENTRY IN EXPENSES SHEET
4. RESULT
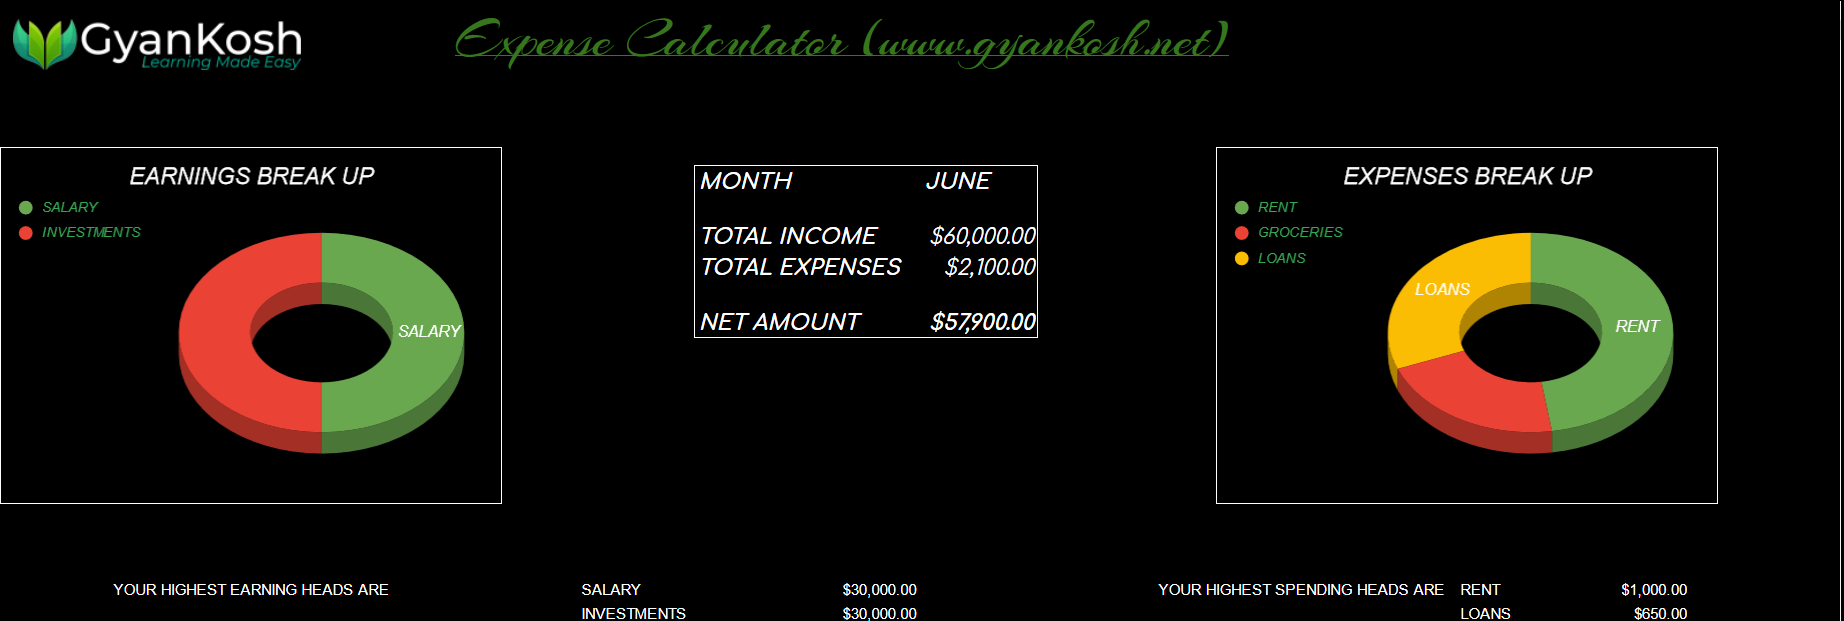
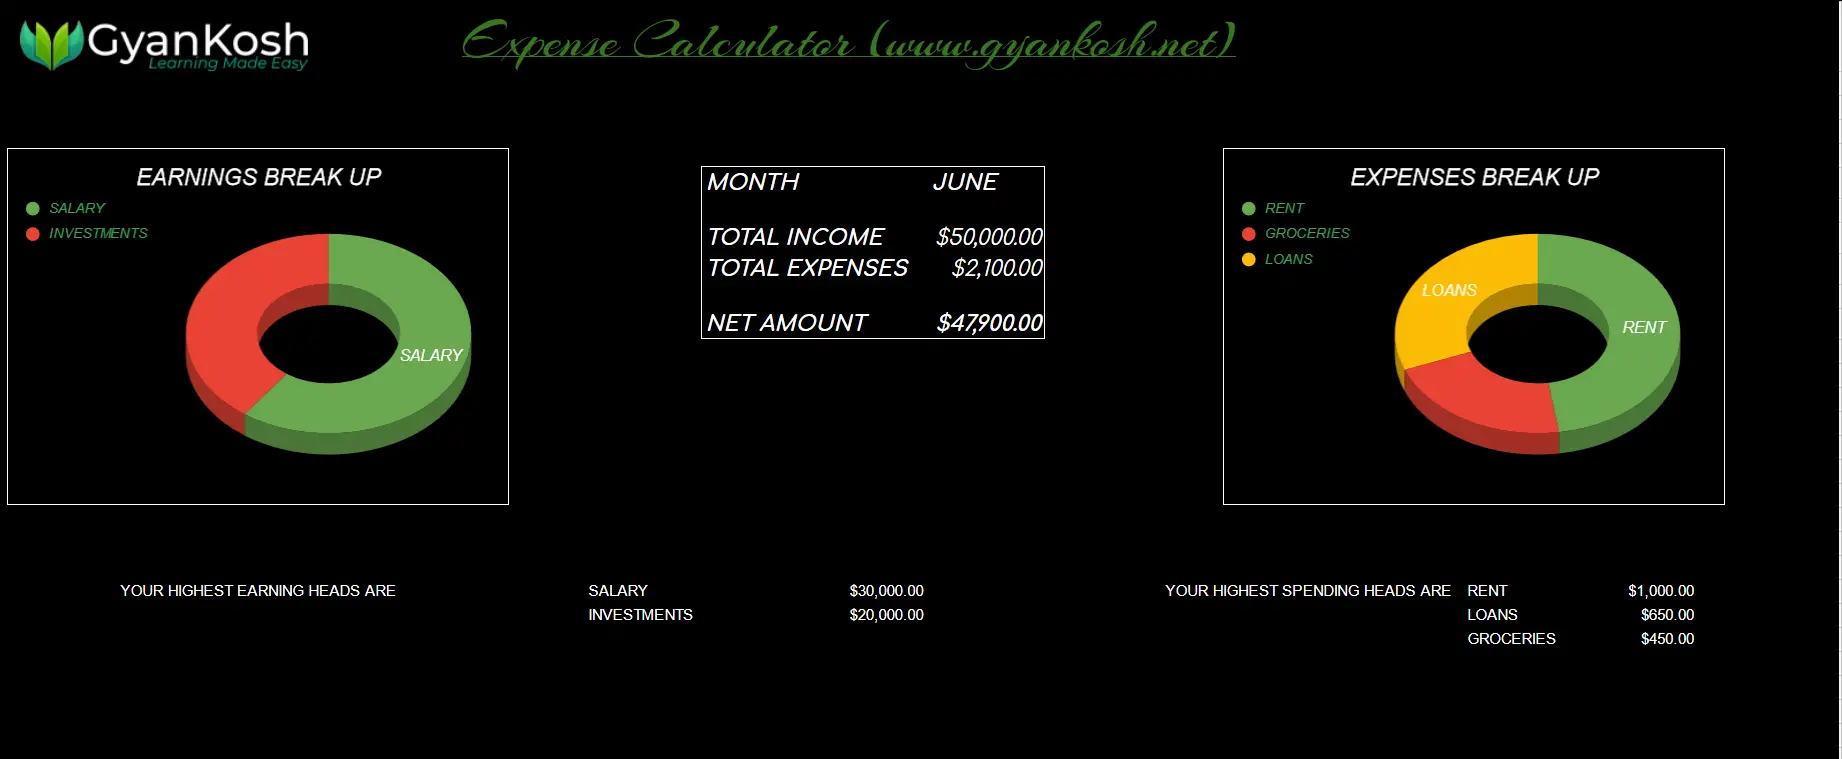
You can check the current status at any instant by opening the OVERVIEW SHEET.
The sheet contains the following information.
- PIE CHART WITH EARNINGS BREAKUP
- PIE CHART WITH EXPENSES BREAKUP
- A TABLE SHOWING TOTAL INCOME AND TOTAL EXPENSES
- TABLE SHOWING NET AMOUNT IN HAND
- HIGHEST EARNING CATEGORY
- HIGHEST EXPENSE CATEGORY
The reference picture is shown below.
DEMONSTRATING THE RUNNING OF THE EXPENSE TRACKER AND CHECKING THE DASHBOARD
The following animation shows the running of the expense tracker.
A simple transaction is recorded and accordingly, the effect is seen on the dashboard.
In this way, we can use the Expense Tracker and plan our budget accordingly.