Table of Contents
- INTRODUCTION
- BUTTON LOCATION FOR ADJUSTMENT OF ROW WIDTH IN EXCEL
- SET FIXED ROW HEIGHT IN YOUR SHEET IN EXCEL
- SET AUTO HEIGHT OF ROWS IN EXCEL
- MANUALLY SET THE HEIGHT OF ROWS IN EXCEL
INTRODUCTION
Rows and columns are the building blocks of any spreadsheet application which makes it mandatory to learn the ways to edit the physical size of the cell which can be a requirement frequently.
“ROW HEIGHT” IS THE HEIGHT OF THE ROW PRESENT IN THE EXCEL SHEET. THERE ARE MANY WAYS TO ADJUST THE ROW HEIGHT.
THE ROW HEIGHT NEEDS TO BE ADJUSTED IF WE HAVE DIFFERENT KIND OF DATA, OR TO MAINTAIN THE UNIFORMITY IN THE DATA OR ANY OTHER REASON.
In this article, we would learn to use the different ways to adjust the row height to our requirement.
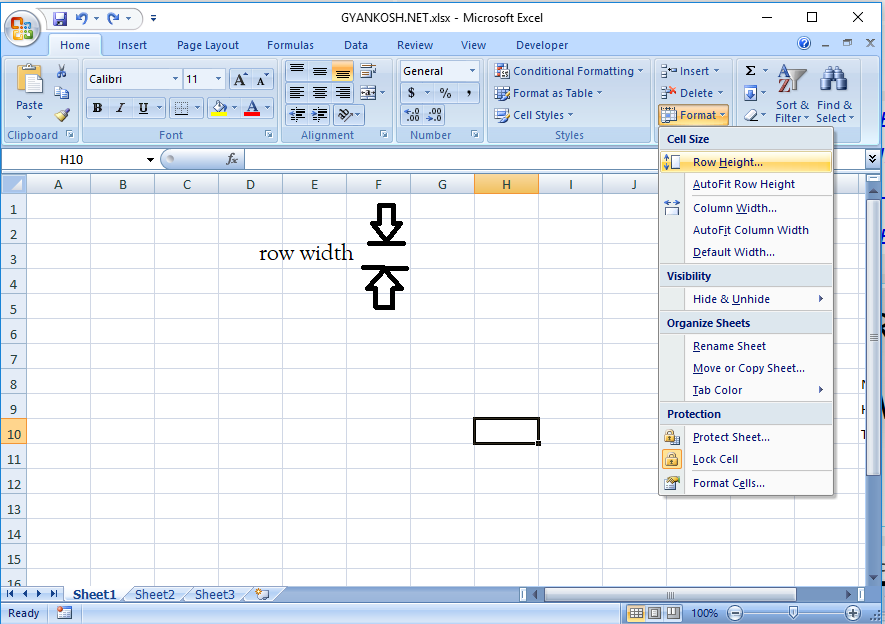
BUTTON LOCATION FOR ADJUSTMENT OF ROW WIDTH IN EXCEL
The option or button for the ROW WIDTH is present under the HOME TAB and FORMAT DROP DOWN under the CELL SECTION.
The location of the button is shown in the picture below .
SET FIXED ROW HEIGHT IN YOUR SHEET IN EXCEL
This option fixes the height of the row as specified by the user.
But before that we need to know about the height scale.
The scale is point based. The complete width is 409 and the default is 15.
| Type | Min | Max | Default |
|---|---|---|---|
| Row | 0 (hidden) | 409 | 15.00 |
For example, if you want the height to be greater than the standard, select it to be more than 15.00, otherwise lesser.
STEPS:
- Select the cell or cells or row or rows where the width is to be changed.
- Go to HOME>CELLS>FORMAT and click ROW HEIGHT.
- In the dialog box, enter the HEIGHT as per requirement in pixels.
If you enter 409, it’ll create a cell equal to the full screen width and the size will reduce proportionately as per the row height entered.
SET AUTO HEIGHT OF ROWS IN EXCEL
If we have a situation where we have different size of data in all the ROWS and we need the row height just fine to show all the data, we can use this option of fixing the auto height of the rows.
USE THIS OPTION IF YOU NEED TO SET THE HEIGHT OF EACH ROW EQUAL TO THE HEIGHT OF THE CONTENT [ BIGGEST FONT SIZE ].
STEPS:
- Select all the cell or cells or row or rows where WIDTH needs to be changed.
- Open the option under tab HOME>CELLS>FORMAT.
- CLICK AUTOFIT ROW HEIGHT.
- The height of the rows will be adjusted according to the font size of the content to make it visible.
THE HEIGHT FOR ANY ROW WILL BE SET ON THE BASIS OF LARGEST FONT SIZE OF ANY TEXT OR NUMBER PRESENT IN THE ROW.
MANUALLY SET THE HEIGHT OF ROWS IN EXCEL
If you feel a bit lethargic in going to the Custom height or Auto fit row height options, there is a manual option too which is quite fast to use.
THIS IS THE FASTEST METHOD BUT USEFUL IF WE WANT TO WORK ON A SINGLE OR A BIG NUMBER OR ALL THE ROWS AT THE SAME TIME . WE MAKE USE OF THE MOUSE WHILE ADJUSTING THE ROWS HEIGHT IN THIS METHOD
STEPS TO BE FOLLOWED:
- Select the row or rows where you want to change the height.
- Just hold the boundary of any of the selected row and drag it as per the required height.
- If, more than one rows are selected, all selected rows will get the same height as fixed manually using the mouse of any of the selected rows.
- If a single row is selected, only the selected row will get the new height.