Table of Contents
- INTRODUCTION
- BUTTON LOCATION FOR ADDING HEADER AND FOOTER IN EXCEL
- STEPS TO INSERT HEADER IN EXCEL
- STEPS TO INSERT FOOTER IN EXCEL
- DIFFERENT AUTOMATIC ENTRIES WHICH CAN BE USED AS HEADER OR FOOTER
- EXAMPLE : INSERTING THE PAGE NUMBER IN THE RIGHT UPPER CORNER OF THE PAGE
- HOW TO EXIT FROM HEADER AND FOOTER SCREEN
- HOW TO REMOVE HEADER AND FOOTER FROM SHEET IN EXCEL
INTRODUCTION
Header and Footer are very important portions of a report or presentation when we are finalizing the reports. So t becomes a necessity to be able to insert a header and footer in our sheets while working on Excel.
First of all, let us understand what is a HEADER and what is a FOOTER.
As it is evident from the name itself,
HEADER is the text or other information which is present in all the pages at the head of the page i.e. at the top of the page . The name header refers to the location of the HEADER in a page.
Similarly,
FOOTER is the text or information which is present at the bottom portion of all the pages. FOOTER name given due to the location of the FOOTER TEXT.
If we need some text to be present on all the pages, we make use of a header or footer. There is a different reserved space for them and the text or any information, which is entered as a header or footer, can only be edited after we change it through the specific option of header and footer.
Let us learn how to insert a header and footer in Excel Sheet.
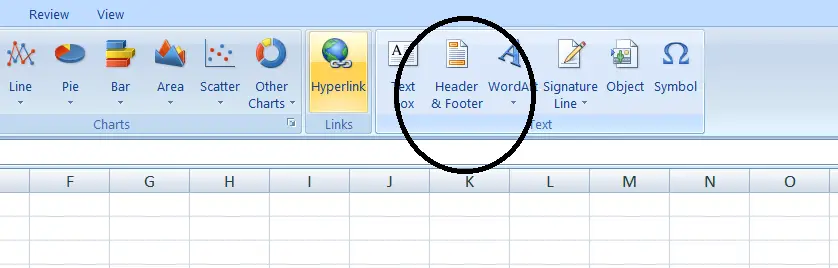
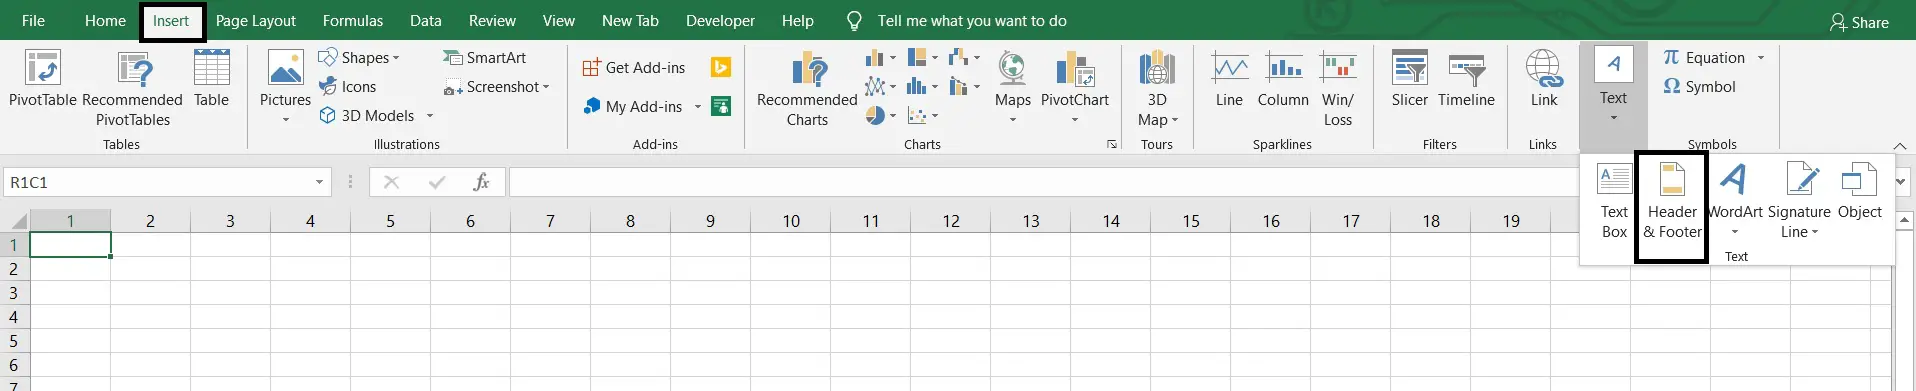
BUTTON LOCATION FOR ADDING HEADER AND FOOTER IN EXCEL
The location of the HEADER AND FOOTER option is given below.
The HEADER AND FOOTER option is present under the INSERT TAB under the TEXT section.
The pictures below show the HEADER and FOOTER button location in both MICROSOFT EXCEL 2007 and MICROSOFT EXCEL 2019.
STEPS TO INSERT HEADER IN EXCEL
STEPS:
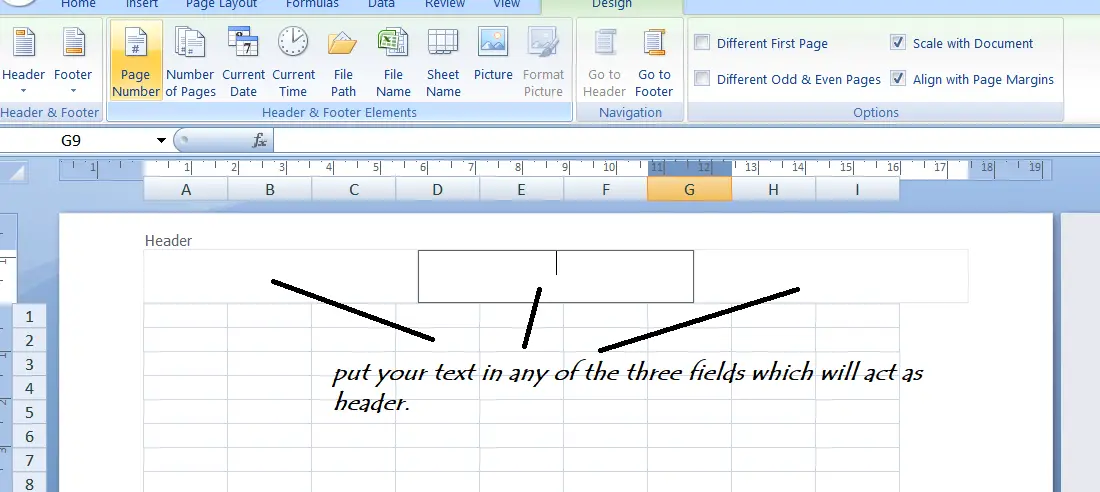
- Go to INSERT TAB >TEXT SECTION and click HEADER AND FOOTER.
- Following screen will be opened with three spaces at the top of the page [ header ] .
- Enter the text in any of the three spaces as per requirement.
STEPS TO INSERT FOOTER IN EXCEL
STEPS:
- Go to INSERT TAB >TEXT SECTION and click HEADER AND FOOTER.
- Following screen will be opened with three spaces at the bottom of the page [ footer ] .
- Enter the text in any of the three spaces as per requirement.

HEADER AND FOOTER ARE VISIBLE WHILE PRINTING ONLY OR WHEN WE HAVE
 SELECTED THE HEADER AND FOOTER OPTIONS. THESE ARE NOT VISIBLE WHILE
WORKING IN A SHEET
DIFFERENT AUTOMATIC ENTRIES WHICH CAN BE USED AS HEADER OR FOOTER
In addition to the custom text header and footer, we have different available options which are automated and can be very useful.
These options are available when we are already inside the HEADER AND FOOTER option.
- Follow the steps to insert automatic option into our sheet
- Select the sheet and go to INSERT TAB > TEXT SECTION and CLICK HEADER AND FOOTER OPTION.
- It’ll take us to the HEADER AND FOOTER ENVIRONMENT [ i.e. The sheet will open like a page with three spaces for the header at the top and three spaces for the footer at the bottom ].
- Click on the space [ Header spaces or Footer spaces ]. It’ll select the respective space.
- Choose any of the given options.
- It’ll be applied for the the complete sheet.
- Repeat the steps if you want to add more automated headers or footers.
- ONE SPACE WOULD ALLOW ONLY ONE AUTOMATED OPTION.
We’re done.
Look at the different available options below.
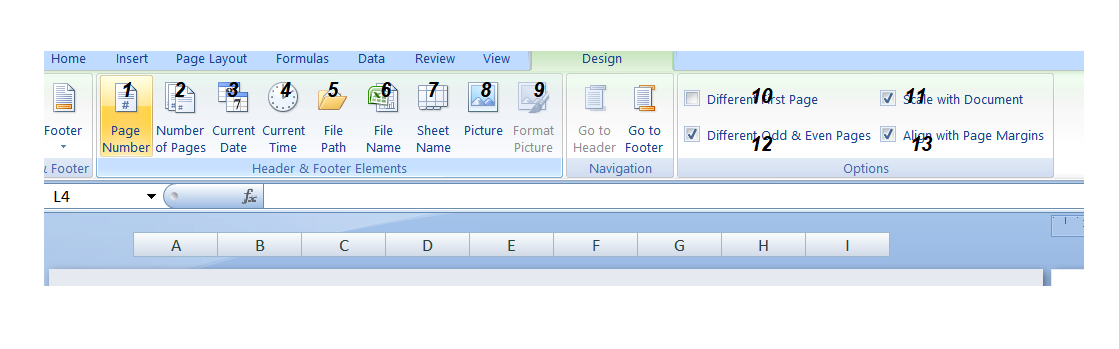
DESCRIPTION.
1. Show the current page number in the header.
2. Show the total number of pages in the header.
3. Show the current date.
4. Show the current time.
5. Show the file path of the file with which you are working.
6. Show the file name.
7. Show the sheet name.
8. Enter the picture in the header. Excel gives the option of adding pictures in the header.
9. Format the picture entered in 8 like the size of the picture etc.
10. It gives you to modify the different headers for different pages.
11. It gives the option of scaling the size of the header with the page.
12. Option for giving two different kinds of headers for odd and even pages.
13. Align the header with a change in page margins.
For the understanding purpose, let us take an example to learn the use of AUTOMATIC OPTION for HEADER AND FOOTER.
EXAMPLE : INSERTING THE PAGE NUMBER IN THE RIGHT UPPER CORNER OF THE PAGE
Suppose we have a sheet in which we want to insert the page number in the upper right corner of every page.

FOLLOW THE STEPS TO INSERT THE PAGE NUMBER HEADER IN THE GIVEN SHEET:
- Go to INSERT TAB and click HEADER AND FOOTER BUTTON under TEXT SECTION as shown in the button location.
- The layout of the page will change and PAGE LAYOUT will open as in the following picture.
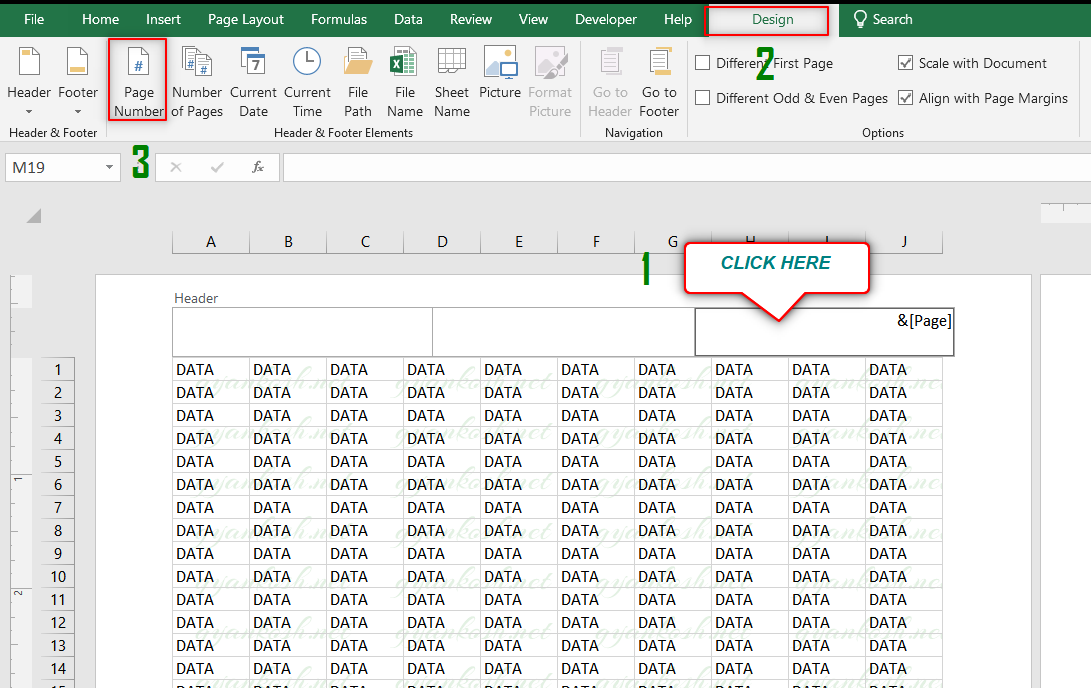
- As we reach HEADER AND FOOTER page layout,click in the HEADER AREA and it’ll show the three sections in the header area.
- Click in the RIGHT SECTION and the header options will open up. If the options doesn’t open up, CHOOSE DESIGN TAB , which will appear only when we select a header section.
- Now select PAGE NUMBER as shown in the picture below.
- Click anywhere else.
- After selecting the page number, we can click anywhere else to see the effect in the PAGE LAYOUT only.
- For our example, following picture will follow when we click at any empty area.
- We can see that PAGE NUMBERS HAVE STARTED REFLECTING ON THE RIGHT UPPER CORNER of the page in a serial.

HOW TO EXIT FROM HEADER AND FOOTER SCREEN
We have successfully created a header for learning purposes.
Sometimes it becomes a headache to get rid of the HEADER AND FOOTER SCREEN.
So follow the steps to exit the header and footer screen and get back to the standard working sheet layout.
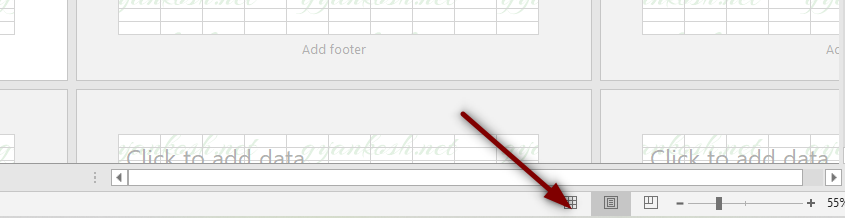
Click on the RIGHT LOWER CORNER a button named NORMAL as shown in the picture below and we’ll be back on to the working screen.
NOTE: HEADER AND FOOTER ARE NOT VISIBLE ON THE NORMAL LAYOUT.
READ ME…
THREE HEADERS AND THREE FOOTERS CAN BE ADDED SIMULTANEOUSLY IN LEFT,MIDDLE AND RIGHT POSITIONS. JUST CLICK TO CHOOSE ANY OPTION AS PER THE PREVIOUS PICTURE. A COMBINATION OF DIFFERENT INPUTS ARE ALSO THERE. JUST CLICK THE BUTTON IN THE EXTREME UPPER LEFT CORNER AS IN THE PICTURE TO CHECK THE AVAILABLE OPTIONS.
HOW TO REMOVE HEADER AND FOOTER FROM SHEET IN EXCEL
If we want to change or remove the header or footer from any sheet in excel, follow the steps.
- Open the Sheet.
- Go to INSERT TAB > HEADER AND FOOTER option under the TEXT SECTION.
- As we go to the option, page layout will change.
- Select the portion where you see the header or footer.
- Select the section containing a header or footer and delete all the entries.
- Click anywhere else.
- Click NORMAL view from the lower right portion [ STATUS BAR ] as shown in the previous section.
- We’re done.
In this article, we learned the way to insert a header and a footer in an Excel sheet, Adding different automatically changing values to a header or footer, removing the header or footer, and how to exit from the header and footer screen or view.