INTRODUCTION
WATERMARK is a picture in the background of the data which can be a logo or a copyrighted image which represents your company or copyrighted content or any message such as DO NOT COPY or CONFIDENTIAL or anything like that.
There can be many reasons to use WATERMARK in our data.
EXCEL doesn’t have a direct option to insert a watermark into our sheets but there is nothing to worry about.
We do have a way to insert a watermark in excel sheets.
In this article we would learn to insert a watermark in excel sheet.
WHAT ARE THE ADVANTAGES OF WATERMARKS
A watermark can be very beneficial when used in our data. A few benefits are listed.
- We can control the copying of our content which can be quite easy in the absence of watermark. [ You can see the usage of watermarks in most of the pictures used by our website which contains the watermark GYANKOSH.NET in many different ways. ]
- We can give the owner information as a watermark.
- Some important message can be given as a watermark such as CONFIDENTIAL, DO NOT COPY, COPYRIGHT DETAILS etc.
There can be many more reasons but these are a few important and main reasons for the usage of watermarks in our images, sheets or documents.
The following picture shows the usage of watermark.

NOTE: ONLY THE GYANKOSH.NET SHOWN IN THE CENTER IS CREATED BY THE STEPS BELOW. THE WASHED OUT GYANKOSH.NET IS NOT ENTERED AS WATERMARK. WE’LL CHECK IT OUT IN THE NEXT SECTION.
STEPS TO CREATE A WATERMARK IN EXCEL SHEET IN EXCEL
Follow the steps to create a watermark in EXCEL 2019. [ The reference pictures are of Excel 2019 ]
- Go to INSERT TAB and click HEADER and FOOTER.
The following picture shows the location of the button.

- As we click HEADER AND FOOTER , the page layout changes and the place holders open to enter the HEADERS and FOOTERS.
- Select the CENTRAL HEADER INPUT SPACE .
- Click PICTURE as shown in the picture below.
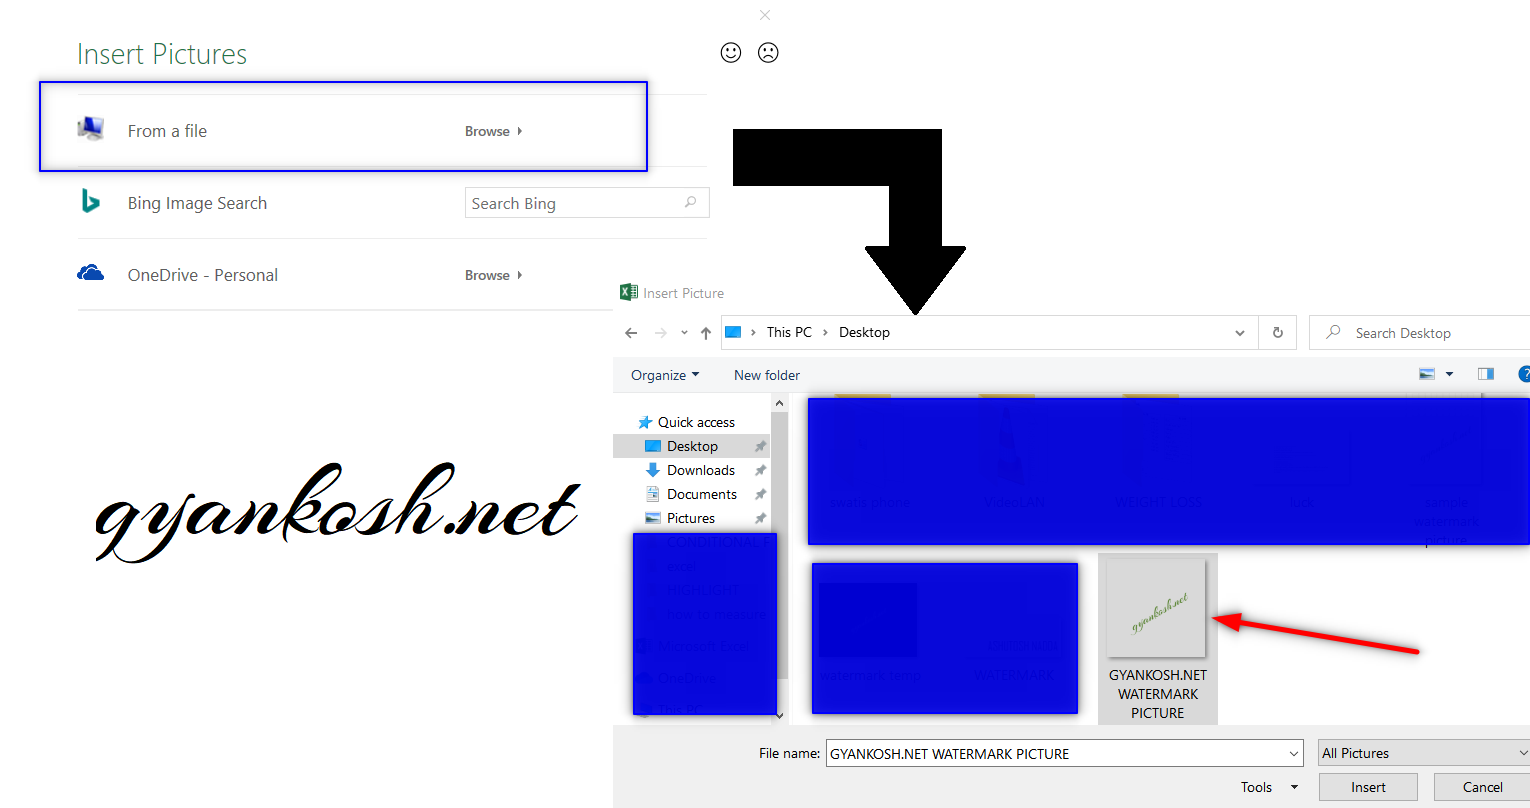
- When we click PICTURE , a small window opens asking the location to get the picture from. You can choose from the local computer, bing web search or onedrive [ Cloud Storage ].
- Choose appropriate location and choose the picture. For our example, we’d choose the first option.
- Choose FROM A FILE and click BROWSE.
- The PICTURE FILE CHOOSING dialog box will open.
- Locate the picture file [ watermark ] and select the file.
- Click OK.
- The following picture shows the process.
- After we have selected the picture , the picture won’t be visible yet but a text &[Picture] text will be visible in the central HEADER.
- Now click anywhere on the sheet and the watermark will be visible.

The following picture shows the watermark which we have created.
This watermark will be available in all the pages of the excel workbook and will be printed when we print the workbook.

AN EASY WAY TO CREATE A REPEATED WATERMARK
THIS METHOD IS USEFUL ONLY IF YOU WANT A BACKGROUND IN EXCEL SHEETS WHICH ARE NEEDED TO BE USED IN SOFT VERSION ONLY AND NOT IN THE PRINTABLE FORMAT.FOLLOW THE STEPS TO CREATE A WATERMARK [USING BACKGROUND IMAGE]
- The background option is present in the EXCEL which helps us to insert a picture in the background directly.
- The picture is repeated but we can’t set the location of the background picture.
- Set the opacity, size etc. of the picture in a good software. [ It means , it is preferable that your background image is ready to be used. ]
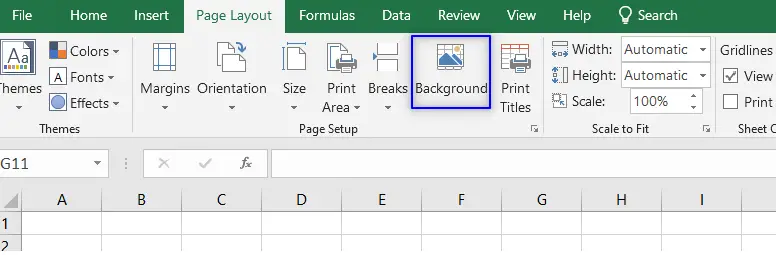
- Go to PAGE LAYOUT > BACKGROUND.
- After clicking the BACKGROUND, Excel would ask us to choose the image to be inserted in the background.
- In the first picture, INSERT PICTURE dialog box would ask you about the source of the picture.
- The picture can be uploaded from the File which is the first option. Clicking this would take you to your computer and you can choose the file to upload.
- The second option is BING IMAGE SEARCH where you can type some search and it would list you a number of images from which you can choose the image to used as a background.
- The third option is ONEDRIVE which is a cloud storage. You can choose the picture from there if you have any.
- For our example, we would go for the first option i.e. FROM THE FILE.
- After clicking from the file, we would reach the directory containing our file and select the file.
- Click OK.
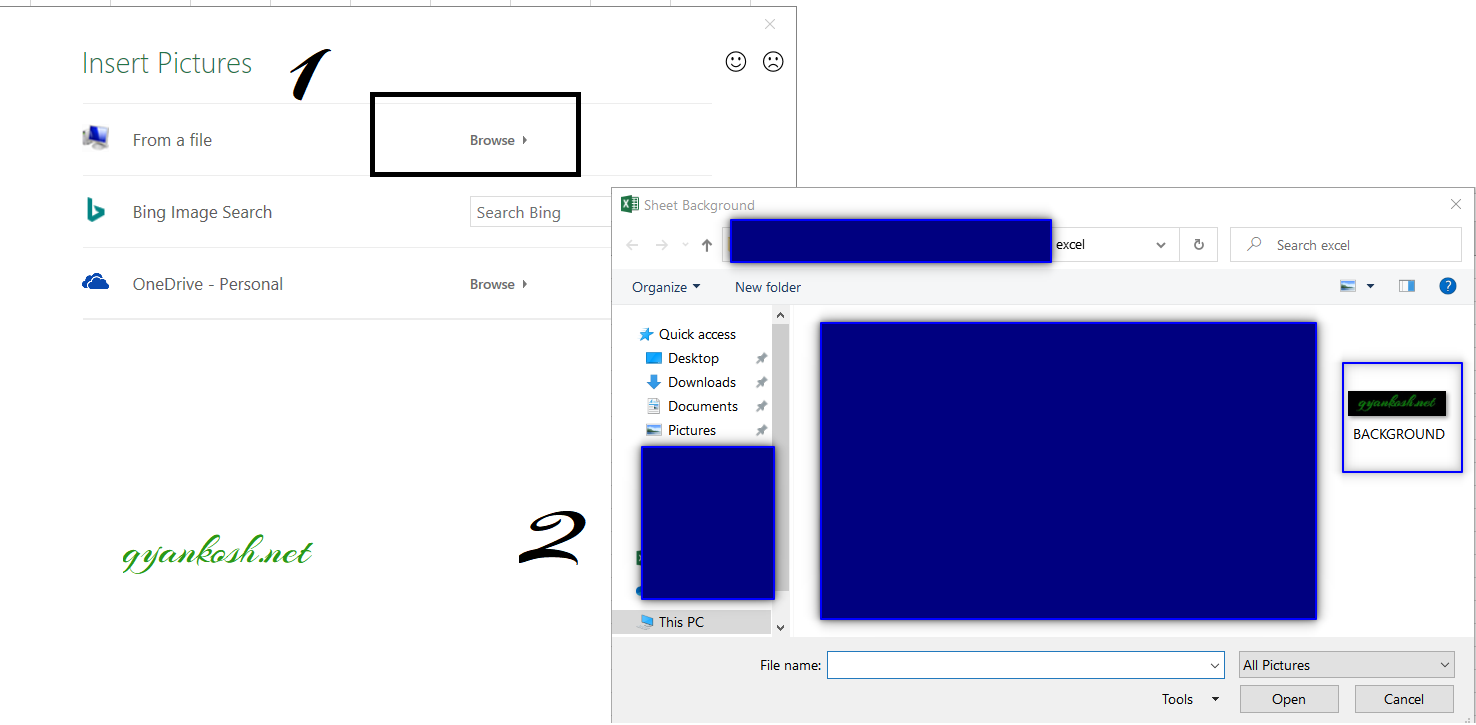
After choosing the background image, click OK and the image would be inserted as a watermark in the sheet.
The following picture shows the example.
NOTE: THIS BACKGROUND WON’T APPEAR IN THE PRINT. SO LIMIT THIS METHOD USAGE UPTO THE SOFT VERSION ONLY.